Rohn 45G tower project for the Repeater Hut
05/15/2015 - The big decision... - I made the big decision - the decision to pull all the old tower stuff out of mothballs and point it towards the sky once again! Putting up a tower is no small feat. There's a million little details most people never think about. This isn't my first rodeo! To a neophyte it can become and surprisingly painful experience of "Oh, I didn't know I needed THAT too!?!" It's a bit more than just digging a hole, setting a tower section in it and pouring in enough concrete and stacking enough pieces of steel to reach the sky...
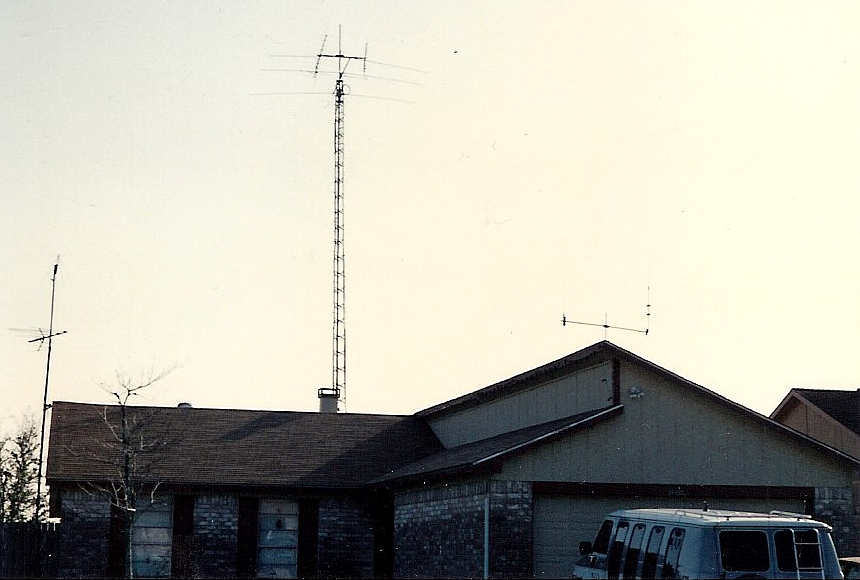
My old tower installation, pictured here, was at our home in Katy and was in place for about 12 years. This new installation will hopefully be up in the air much longer!
Every successful tower project starts with a PLAN! The first thing I needed to do was find "the spot". Which sounds much easier than it is, in reality. I have two towers to raise. One was easy to locate, near the shack and some place easy to get to with a man lift. The 45G tower I have on hand will handle the repeater systems. It will end up being a 90 ft. tower with guy wires. For this one, I don't need to pour one base, but FOUR tower bases! One for the tower itself and three more for the guy wire anchor points. (That's a LOT of concrete!) Each guy point will be a short Rohn 45G tower to keep the guy wires up and away from the ground so I can use a tractor around them.
My wife and I went out to the corner of the farm, next to the repeater hut and wandered around with a 100 ft. surveyors tape, a hammer and several stakes. We set a stake and measured the guy lines. And then did it again THREE more times to get it located in "just the right spot". Once the digging begins and the concrete is being poured, there won't be much of a chance to change things. Surveying the 120 degree split for the guy points can be a chore with skeeters chewing on you!
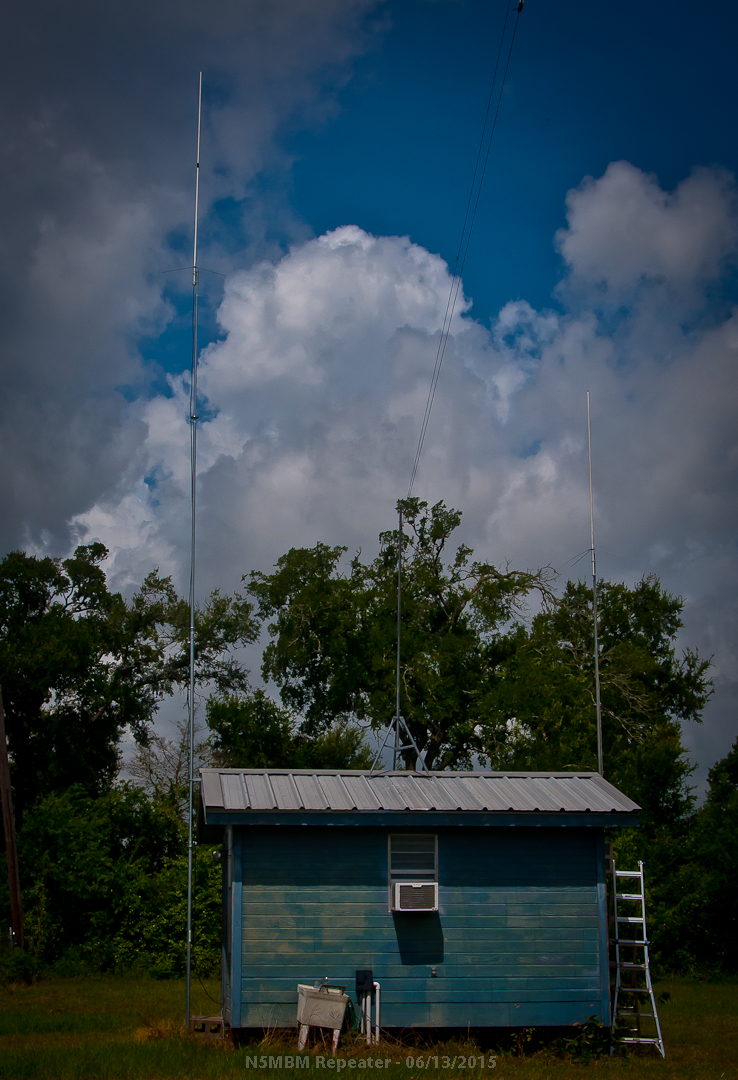
For the 90 ft. tall Rohn 45G tower, I picked a spot close enough to the "repeater hut" to make it easy to get the feedlines inside but far enough away so that I can mow around things easily. I picked a spot I could get all the guy wires over and around the things I needed to and have enough room to get the tractor UNDER the wires without a chance of "clipping" one some day when I am not paying all that much attention.
Now that I had my spots picked out, marked and all mapped out, it was time to turn to gathering the tools and inspecting the tower sections on hand to inventory what else I will need to make this project a reality. You never want to be up at 70 ft. on the tower and have someone tell you from down below - "We just ran out of bolts and hardware!"
The list of needed parts quickly grew. After 15 years, I have no idea where the 1200 lbs. (seemed like it!) of hardware that used to hold this thing together had gone... I am sure it is in the barn somewhere! But where?!? Bolts, nuts, lock washers, plates, cables, straps, clamps, you name it, I was looking for it! Of course, I couldn't find it ALL!
I gathered my tools - you always need more than one tower climbing belt! I found my little tower climbing bag, my 100 ft. rope and pulley set, buckets and a lot of hardware - but not ALL of it. I quickly figured out I did NOT want to use my old Gin pole rig - it weighed a TON and I am not as strong as I once was! I also needed a Rohn tower jack - I had always borrowed one. Now there is a better design out there and I grabbed it - It's called a "Yellow Jack" and it addresses each and every single bitch I ever had about the original Rohn tower jack I had used in the past. Checkout their Yellow Jack YouTube video!
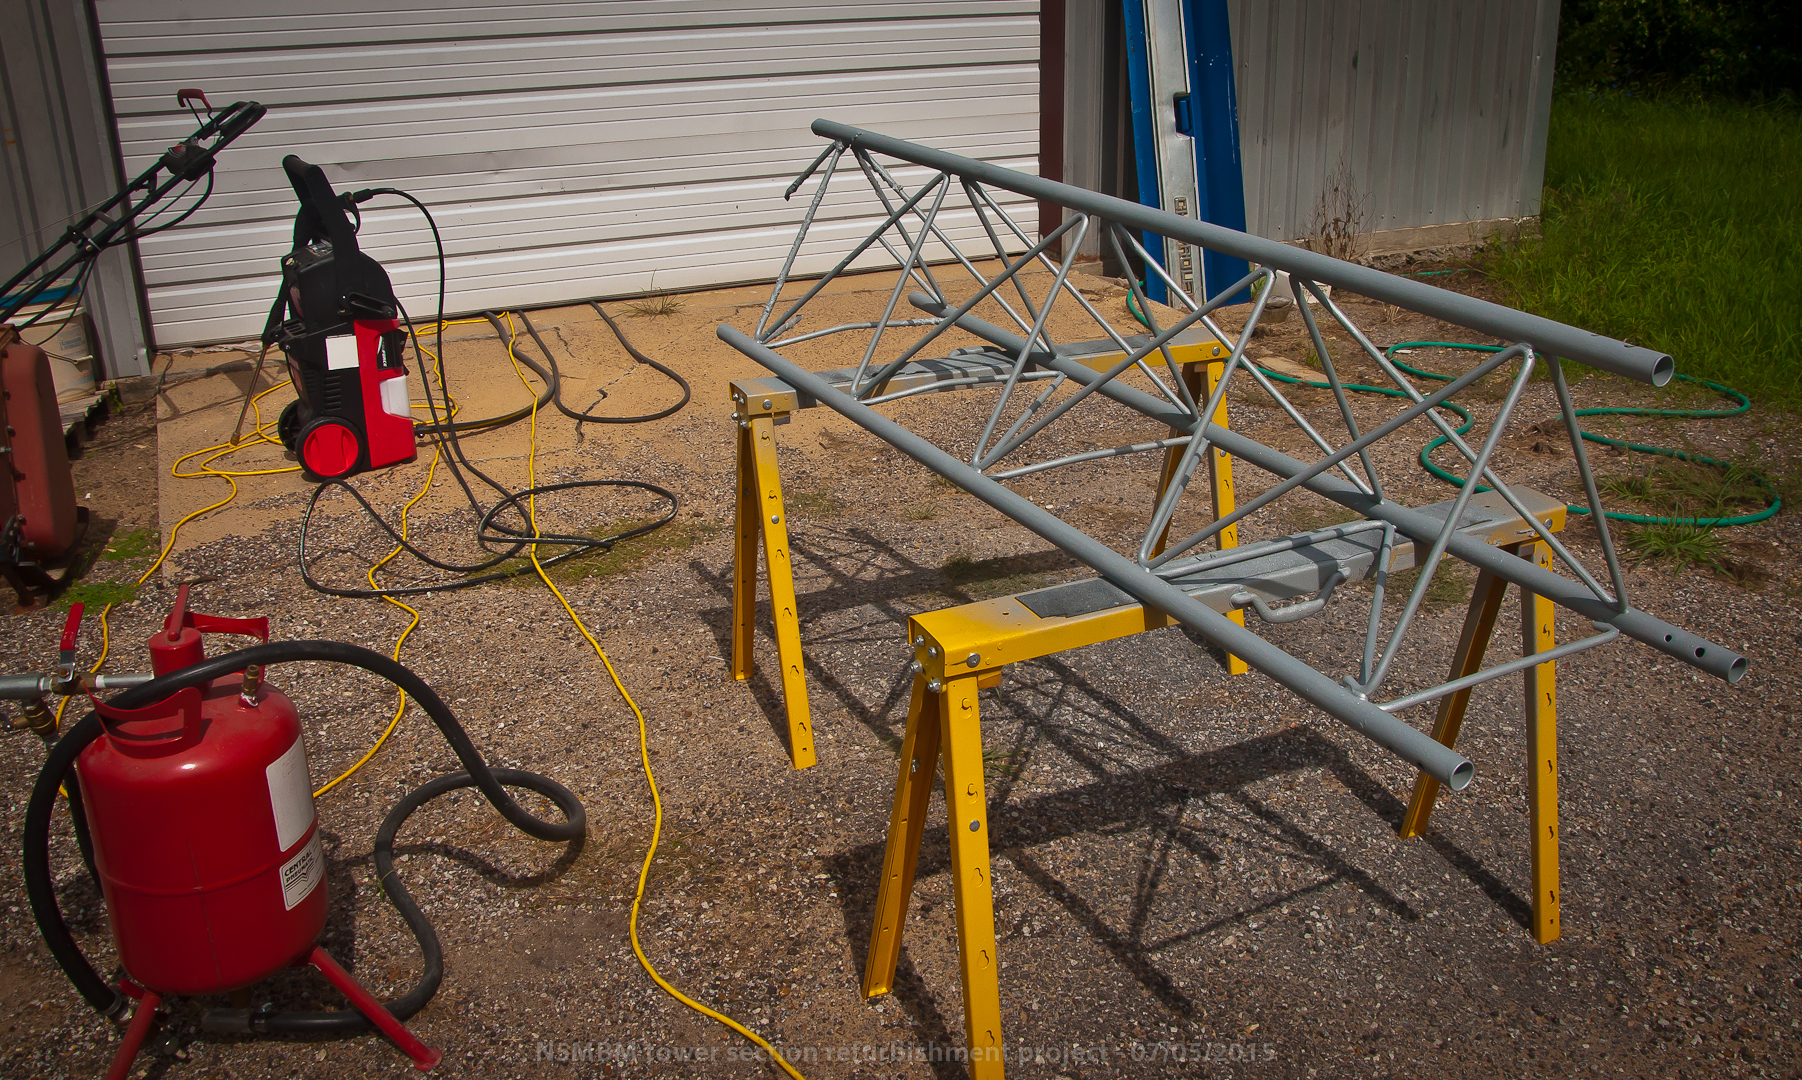
Next is refurbing the tower sections! After laying on the ground, in the chicken coop and next to the greenhouse, they look like they could use a little TLC. One by one we are putting them on saw horses outside the barn and going after them with a stiff wire brush mounted on a big craftsman hand held buffer from hell - this thing will tear your arm off if you don't pay attention! Not to mention, it will rip skin right off of your body in the blink of an eye like a hungry shark (I have the scars to prove it!!!). But it does an awesome job of ripping years of corrosion and crud from a 50 year old tower section.
These Rohn 45G tower sections I am putting back up were originally a LORAN tower for the US Coast Guard down near Bay City, TX. Erected in 1964, it came crashing down to the ground in Hurricane Alicia in the 1980's. The NON twisted sections were gathered up by some Ham friends of mine and I came into possession of them in the late 1980's. They were installed at my home in Katy for 12 years. When I moved out to Chappell Hill, I took it all down in the year 2000 and stacked them in a pile here at the farm. And there they sat for 15 years. But pieces of it found new life. They have done a wonderful job of holding up my scrap wood pile, holding up hundreds of plants outside my greenhouse and even held up tarps over the chicken coops for shade...
Keep in mind, these tower 45G sections are over 50 years old now - they stood the test of time on the sea coast and then spent a couple of decades up here in the heat. But that does NOT mean they aren't serviceable. Quite the contrary, most of these sections are 100% sound. But after 50 years, it is normal to see some surface rust. A couple of sections have a little more than surface rust. A quick blast with a stiff wire brush will take care of most of it. A good quick blast of galvanizing spray and the surface rust will probably be kept at bay for about 10 to 20 years. But I have to inspect every single inch of every tower section for structural rust that has penetrated beyond the surface and cull what I need to. I re-spray the good ones before they get the seal of approval to become another vertical tower set in concrete trying to touch the sky. The Rohn 45G sections that don't cut the mustard and have a little more rust than normal, will become anchor points set in concrete.
TIP - Don't EVER sandblast tower sections to the bare metal IF you can help it!!! That hot dip galvanized surface will last 100 years if you let it. If you rip into it with a grinder you just open up the STEEL to rust. Instead use a stiff wire wheel brush and a can of Rustoleum Cold Galvanizing spray IMMEDIATELY upon finishing up with the wire wheel (and blowing off the dust with compressed air - wear a respirator, you dont want zinc in your lungs!). It will make them last another 50 years! Be gentle if you have to sandblast!
Once you finish removing crud - hit the entire section with galvanizing spray to cover everything - and I do mean EVERYTHING. Any little spot you missed will be the first spot to start rusting again! Take your time, do it right and put on one more coat than you THINK you need... Wear a respirator, you do NOT want all that zinc dust in your lungs! Let it dry over night before you move it - seriously. You will THINK it is dry out in the sun but it isn't finished BONDING with the tower yet. It takes 6-12 hours, at least - even if it FEELS dry! Keep in mind that the original coating will last close to 100 years. Your cold spray job will last 10, maybe 20 if you are lucky.
06/29/2015 - Waiting is the hardest part... Now I am waiting for parts and tools to arrive via UPS and the fickle Texas weather to cooperate... I am working on tower sections in the mean time, making them all pretty and silver. The "spots" are picked out, marked and the grass killing has begun. I will not break ground and start digging the holes until everything is in place, on a shelf, stacked and ready to go. The pile of hardware is going to be impressive to say the least - with TWO towers to erect this summer, I am not taking any chances on screwing things up!
07/04/2015 - I have refurbished most of the 45G tower sections now. By using a brush on them, sandblasting them until my skin bled (LOL) and shooting them with zinc spray and re-galvanizing them. I got rid of a LOT of rust! Only ONE tower section had any serious rust damage, on that one the one end that is damaged will be cut off and sunk into concrete anyway, so it all worked out! I have poked through the barn and found MOST of the hardware for the guy points, the anchors and the cable. Then I got on the Internet and I ordered turnbuckles, hardware, thimbles and clamps for the tower project. And I had to buy all new tower section bolts from Rohn for the 45G tower, I still can't find mine and this is a NEW install, might as well use all new hardware to be safe, right?! Some of the sandblasting is slow going, but it's getting there! I have two sections of 45G left to sandblast.
07/05/2015 - More sand blasting! Here is what I started with... 50 year old Rohn 45G tower sections that have spent a good part of their life down on the Gulf Coast. Click on the photos for more detailed images. They were pretty grungy looking but after a close inspection, 99.9% of the rust I found was only minor surface rust and salt water exposure corrosion that even the zinc reacted to.


And here is what they look like after they are power washed, brushed down with a coarse wire wheel, sandblasted and shot with cold galvanizing compound!
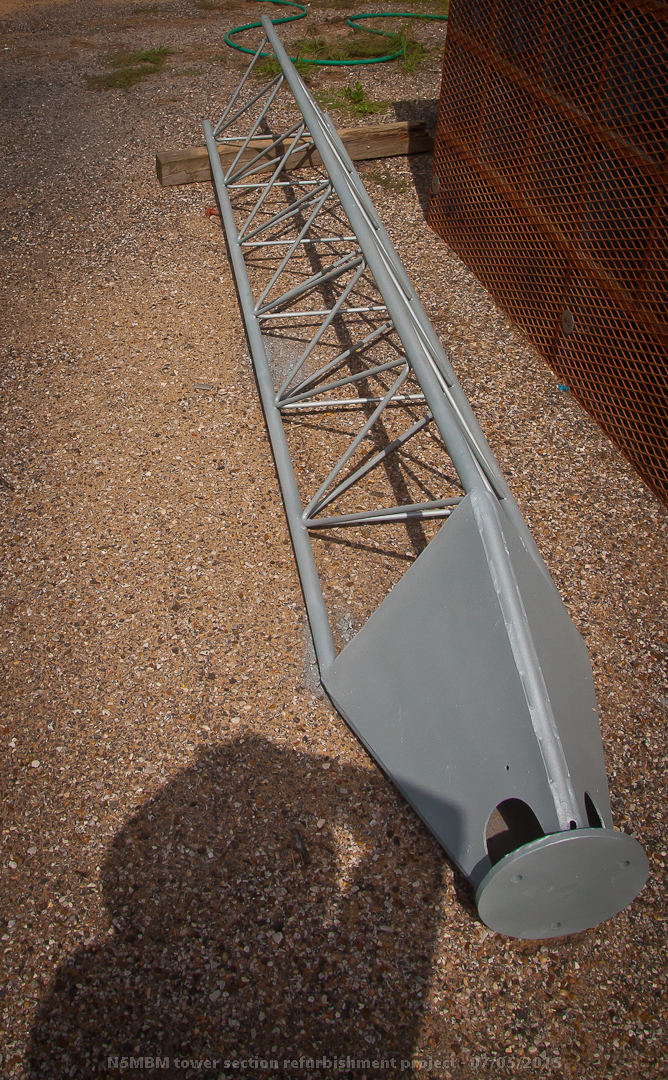
The results seem to be worth it! Most look like they are brand new!
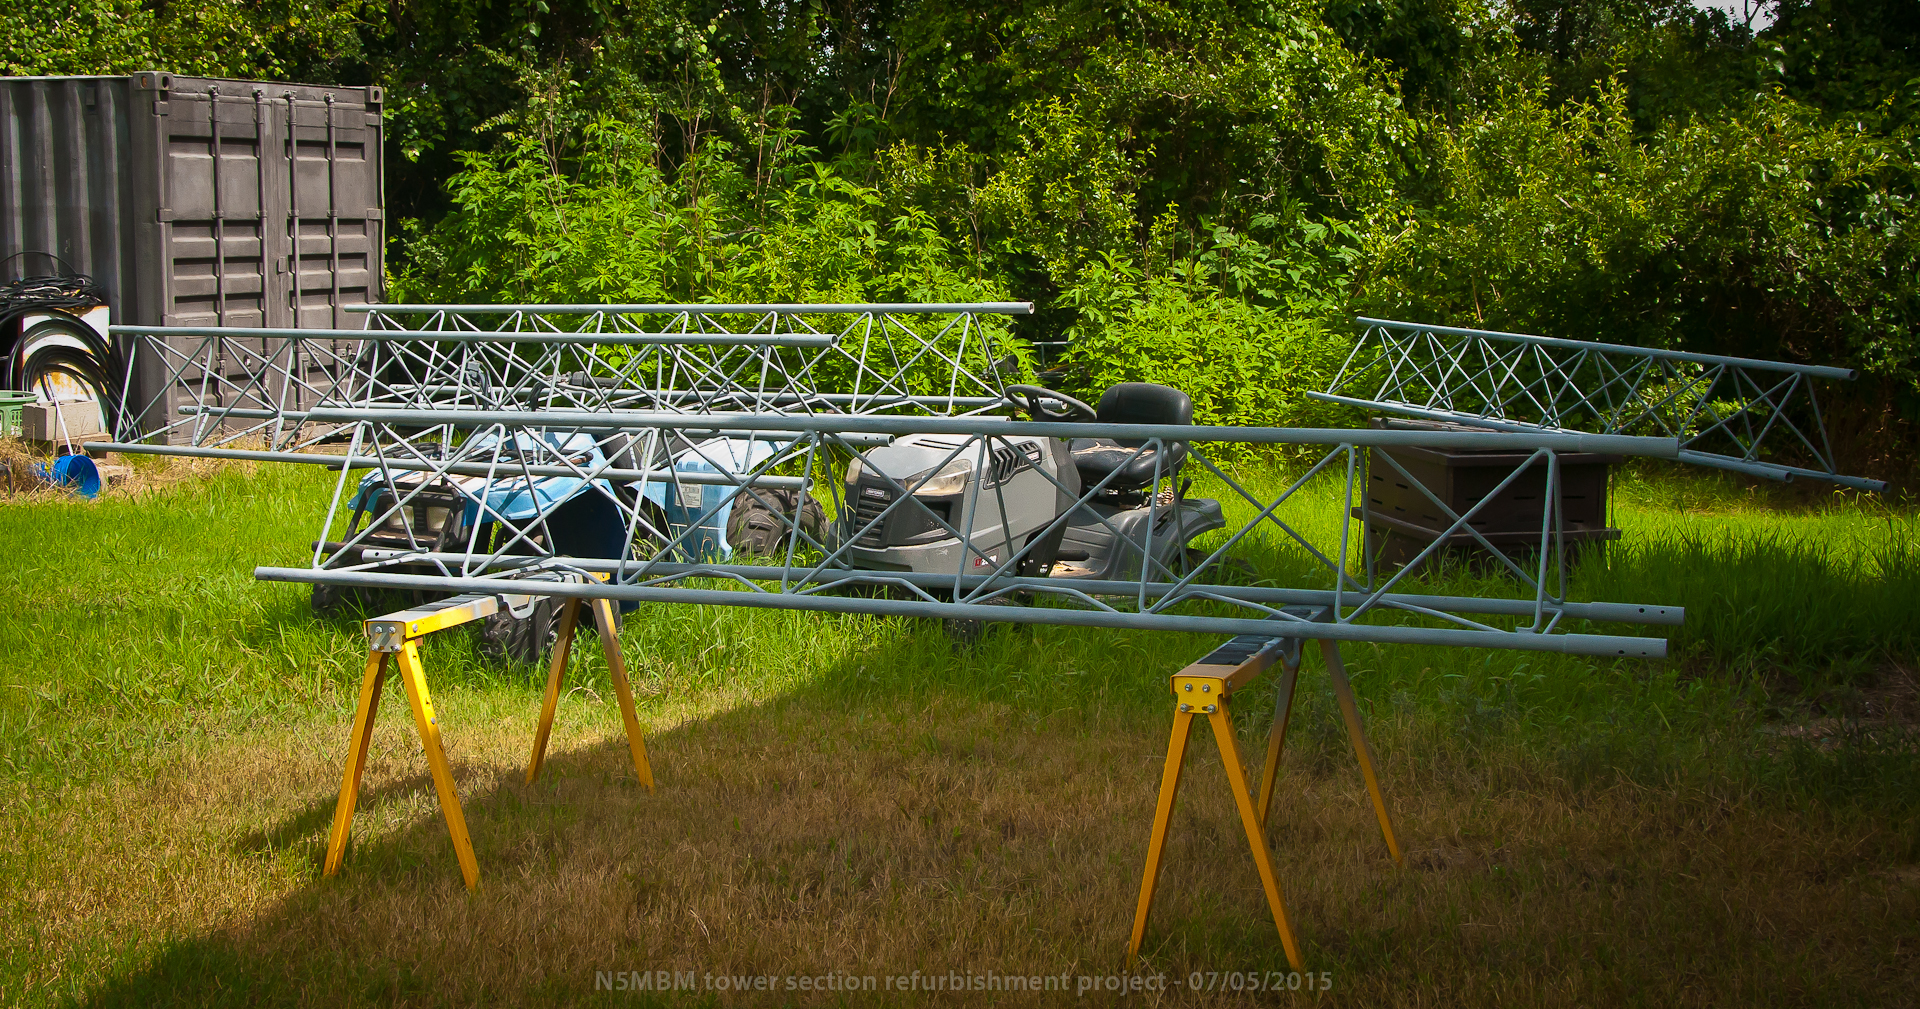
I have 2 more sections to do and then I am done with the sand blaster (and sand in every crevice on my body)!
07/06/2015 - The tower sections are all refurbished now. I finshed them off this morning. I think they look pretty good. I could probably use another dozen cans of bright galvanizing spray but I am pretty tired, my hands are sore and they already have a pretty heavy coat on them after two passes. I think they are good for another 10-20 years of trying to touch the sky... Now I can go take a shower and get all that sand and the sprakly zinc overspray I have in every single solitary crevice and fold on my body off of me!!! I looks like someone bombed me with silver glitter!
Now I get to sit on my hands and wait patiently for all the hardware and parts I ordered to show up with the friendly UPS man...
07/23/2015 - I have been busy with my little Aluma Tower but the bolts came in and I am about ready to start the digging hole. A massive 6'x6'x6' hole in the ground to later be filled with rebar and concrete. I will have to borrow a back-hoe from a friend of mine for this job! I have some more hardware to buy first though. I keep finding things I am going to need (like bolts and nuts!) and better to find out now during inventory and mock up than when I have a tower crew standing around looking at me! But everything is stacked and baking in the sun. My big 12 inch auger arrived and all I need to start digging holes is a 3 ft. extension bit for my tractor mounted post hole digger. "Just one more thing" - right?
8/15/2015 - We went to the TX VHF FM Society SummerFest in Austin and I came home with 6 new sections of Rohn 45G tower with most of the hardware I need to complete the project. Now I have enough for a 100 ft. tower! Now I need to dig a very big hole in the ground and fill it with concrete and steel... (In August, ugh!)
9/15/2015 - We came to a realization, what we brought home from Austin was NOT Rohn 45G but it was actually Rohn 55G! They aren't the same... 55G is heavier duty than 45G and a little bigger and heavier too. 46G tower sections are about 83 lbs. These 55G sections are more like 100 lbs each. This just means that the tower project just became a bit more complicated... So now I have decided to put up the 60 ft. of 55G and put up 40 ft. of 45G as well - the base of the 45G tower being the first guy point for the 55G tower. Giving me a new HF tower and a repeater tower!
I had to borrow a backhoe - it wasn't an option, it was a necessity! Renting one for this multi-day job was out of the question, just too expensive. Luckily a friend had one in his barn he allowed me to attach to the back of my tractor and drag home for a few days work.
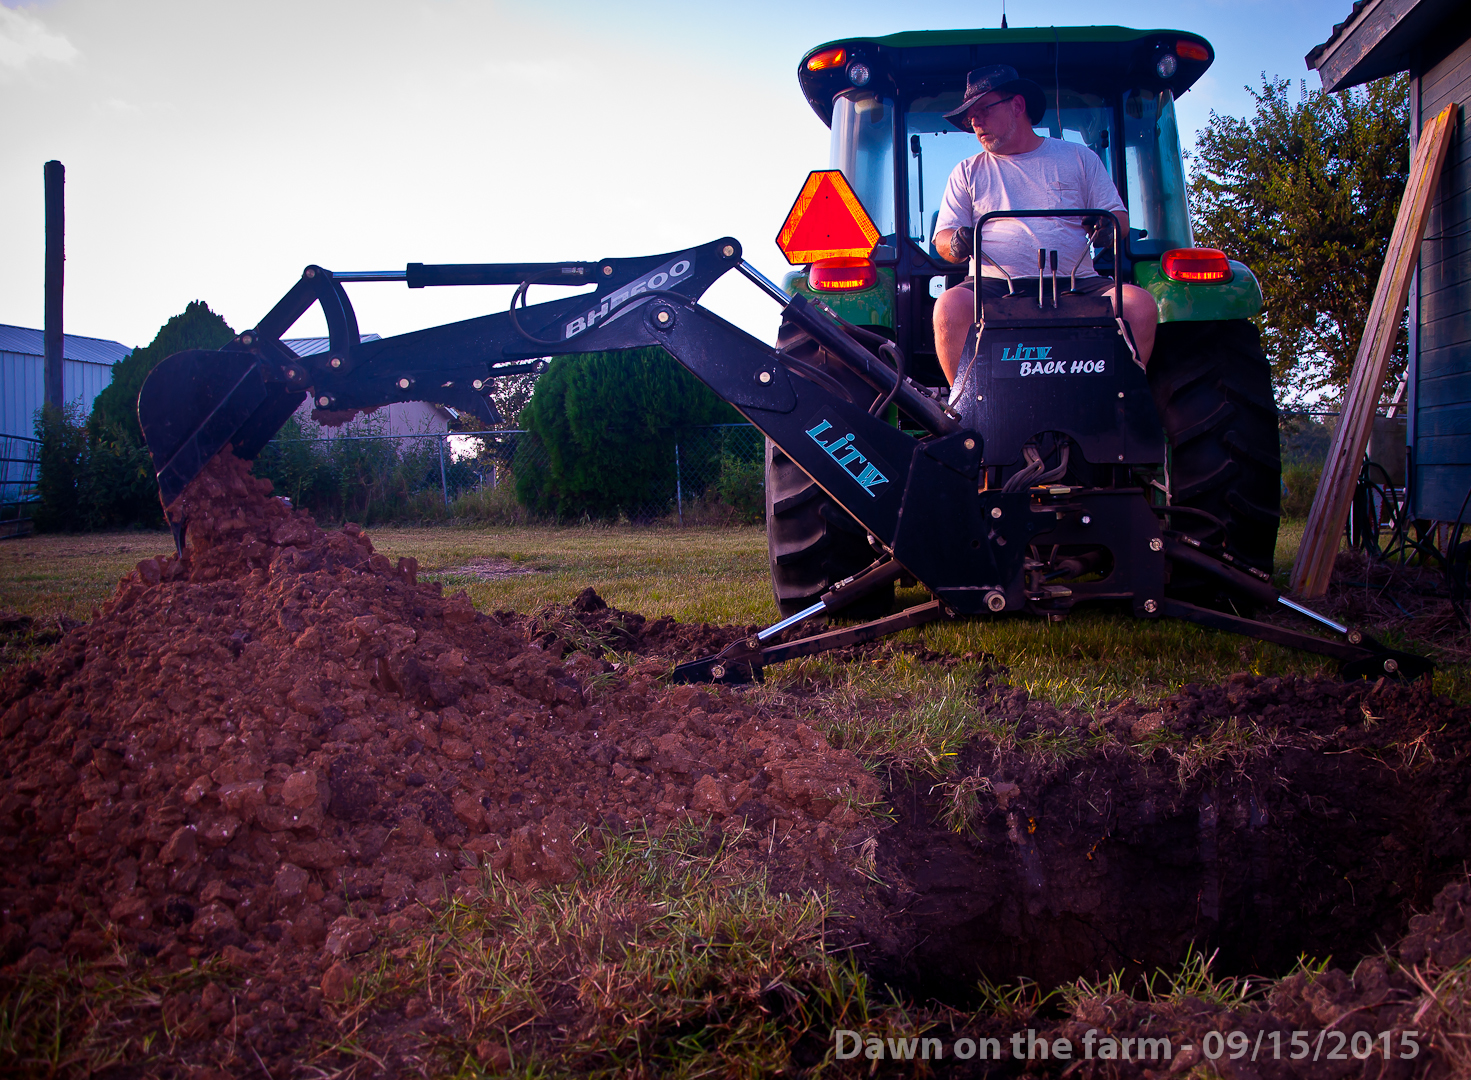
It is absolutely amazing to me how quickly a job can progress once you have the right tools in your hands!
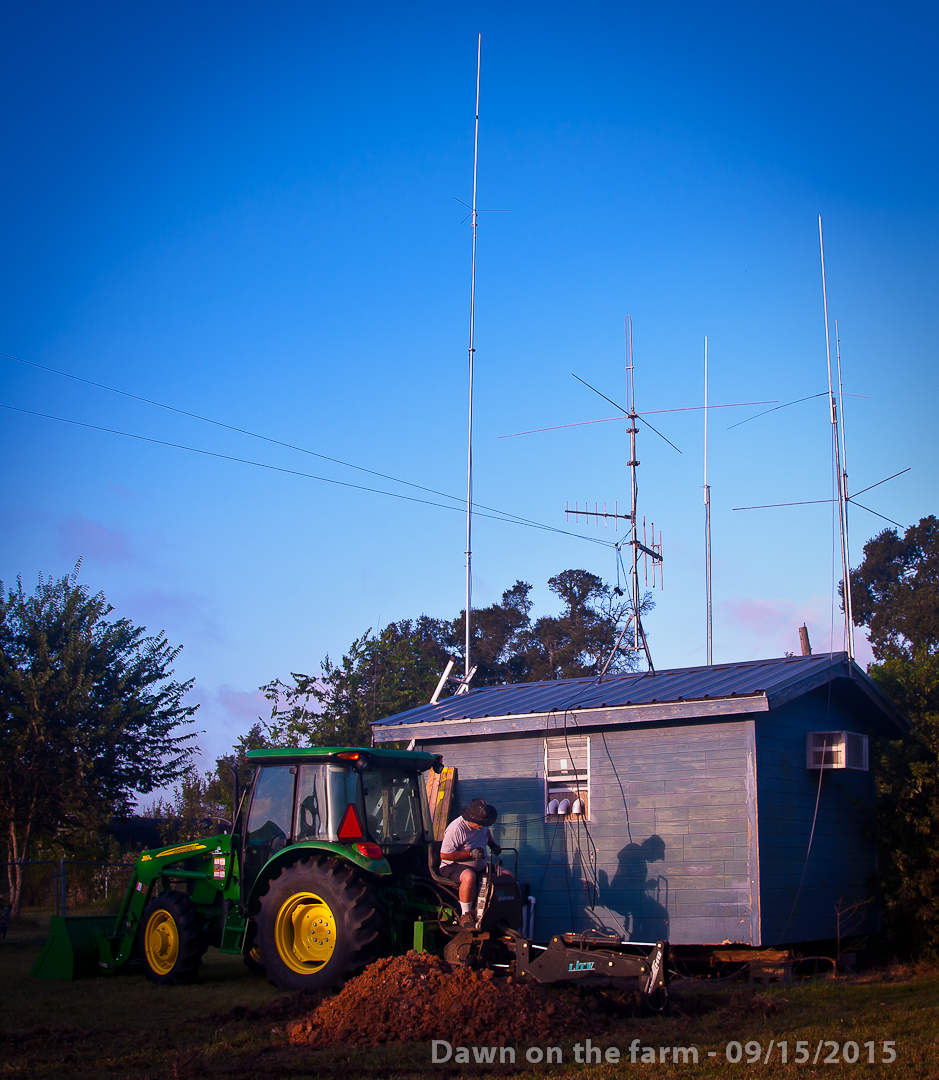
Learning how to use the backhoe was a lot of fun. It took a while, but I got the hang of it pretty quick!
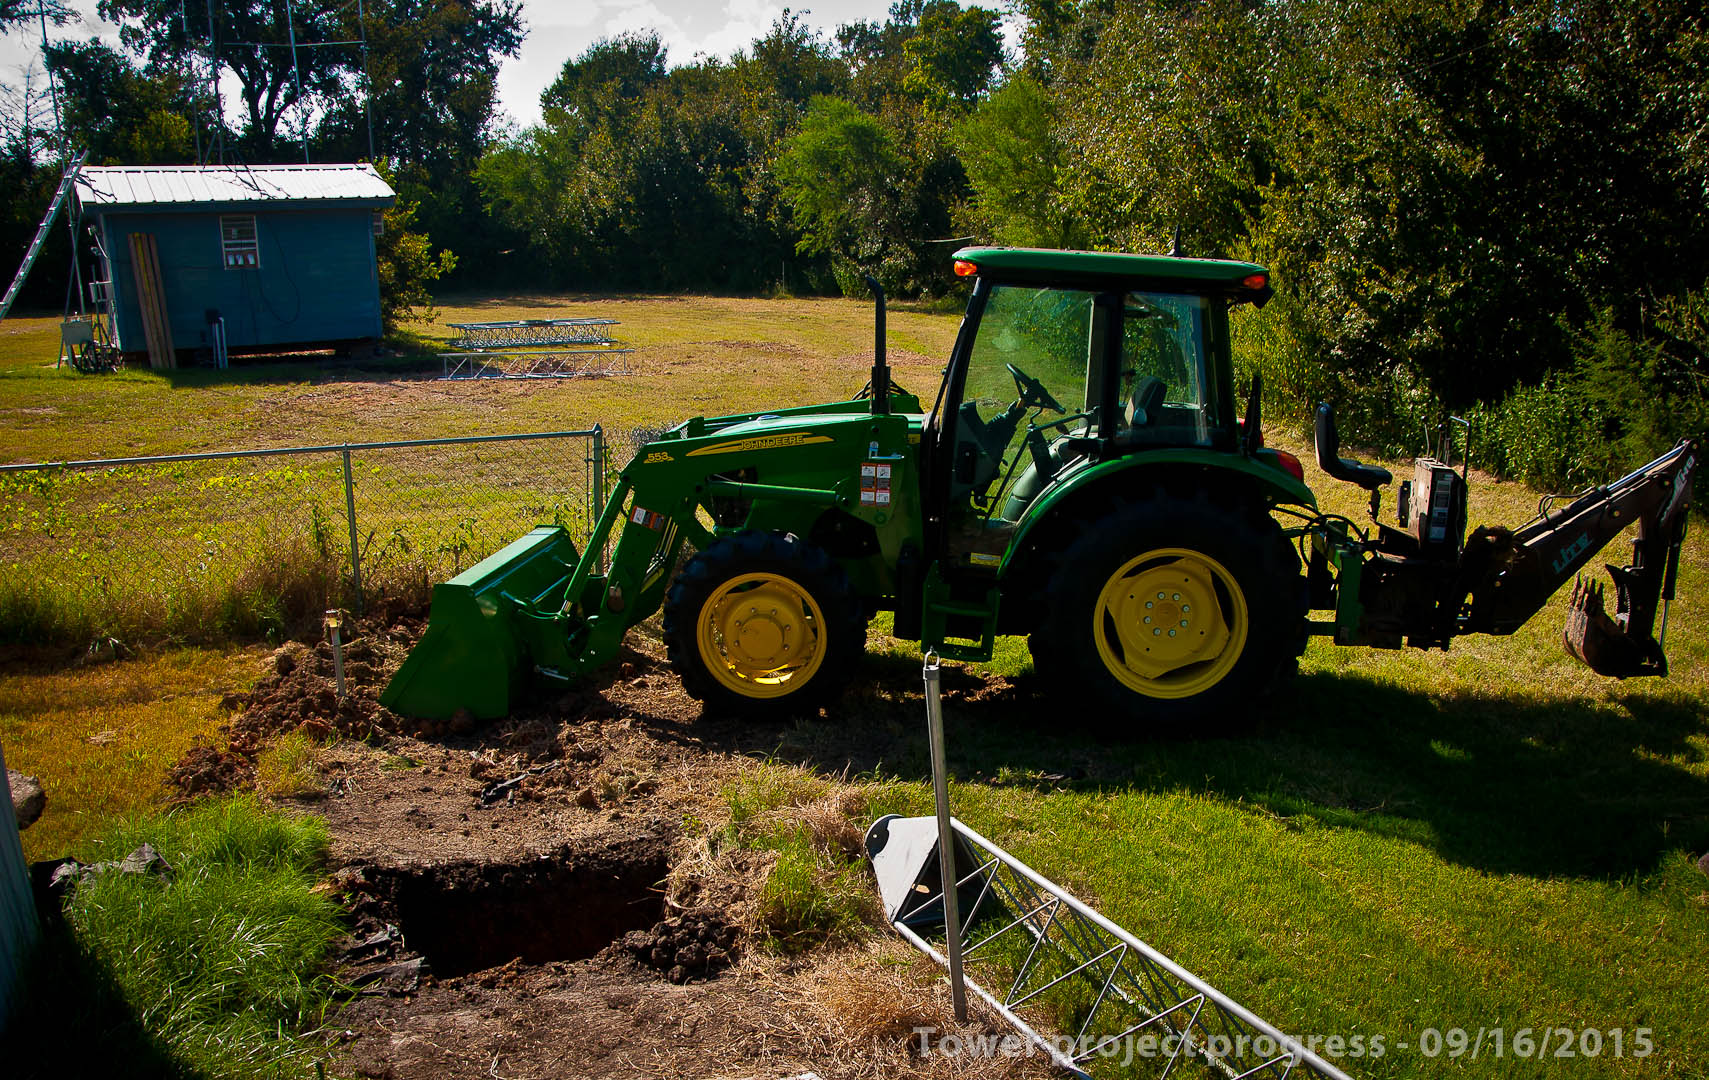
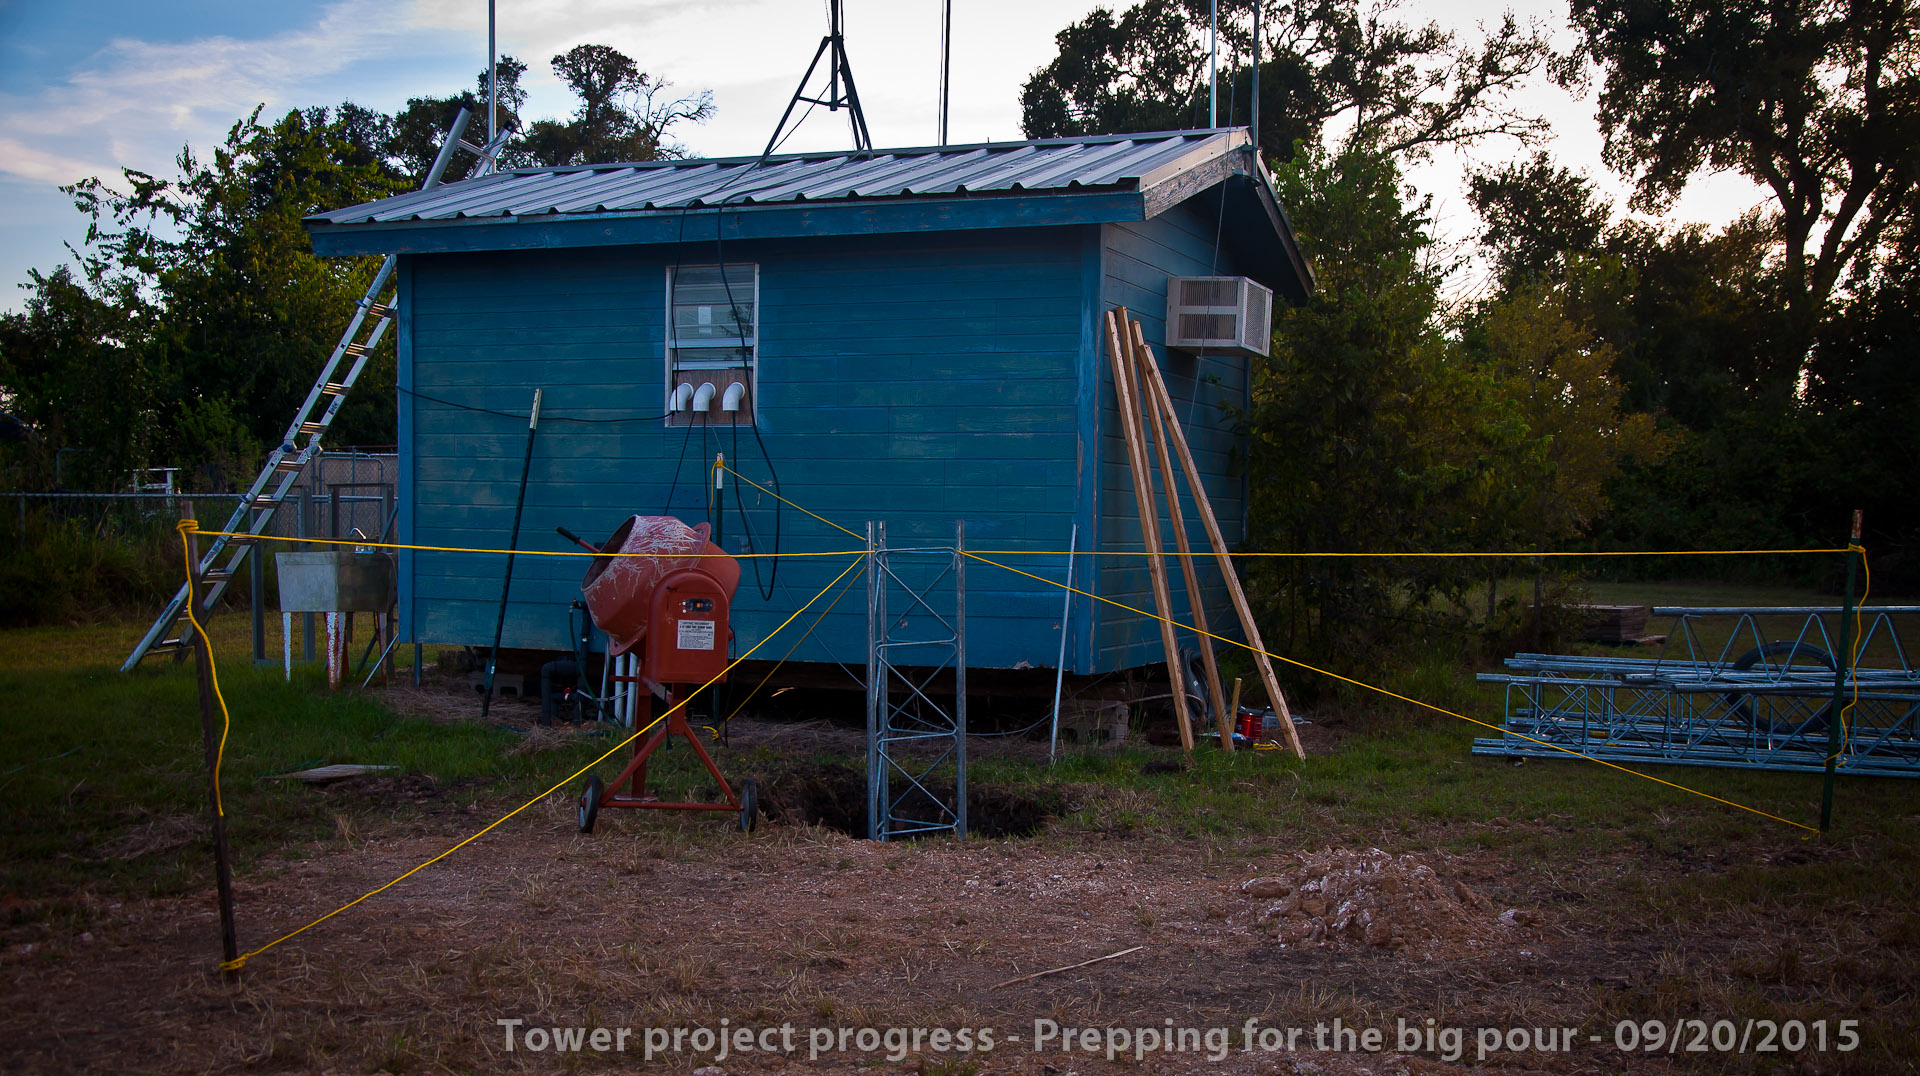
Here is the completed 45G tower hole behind the guest house.
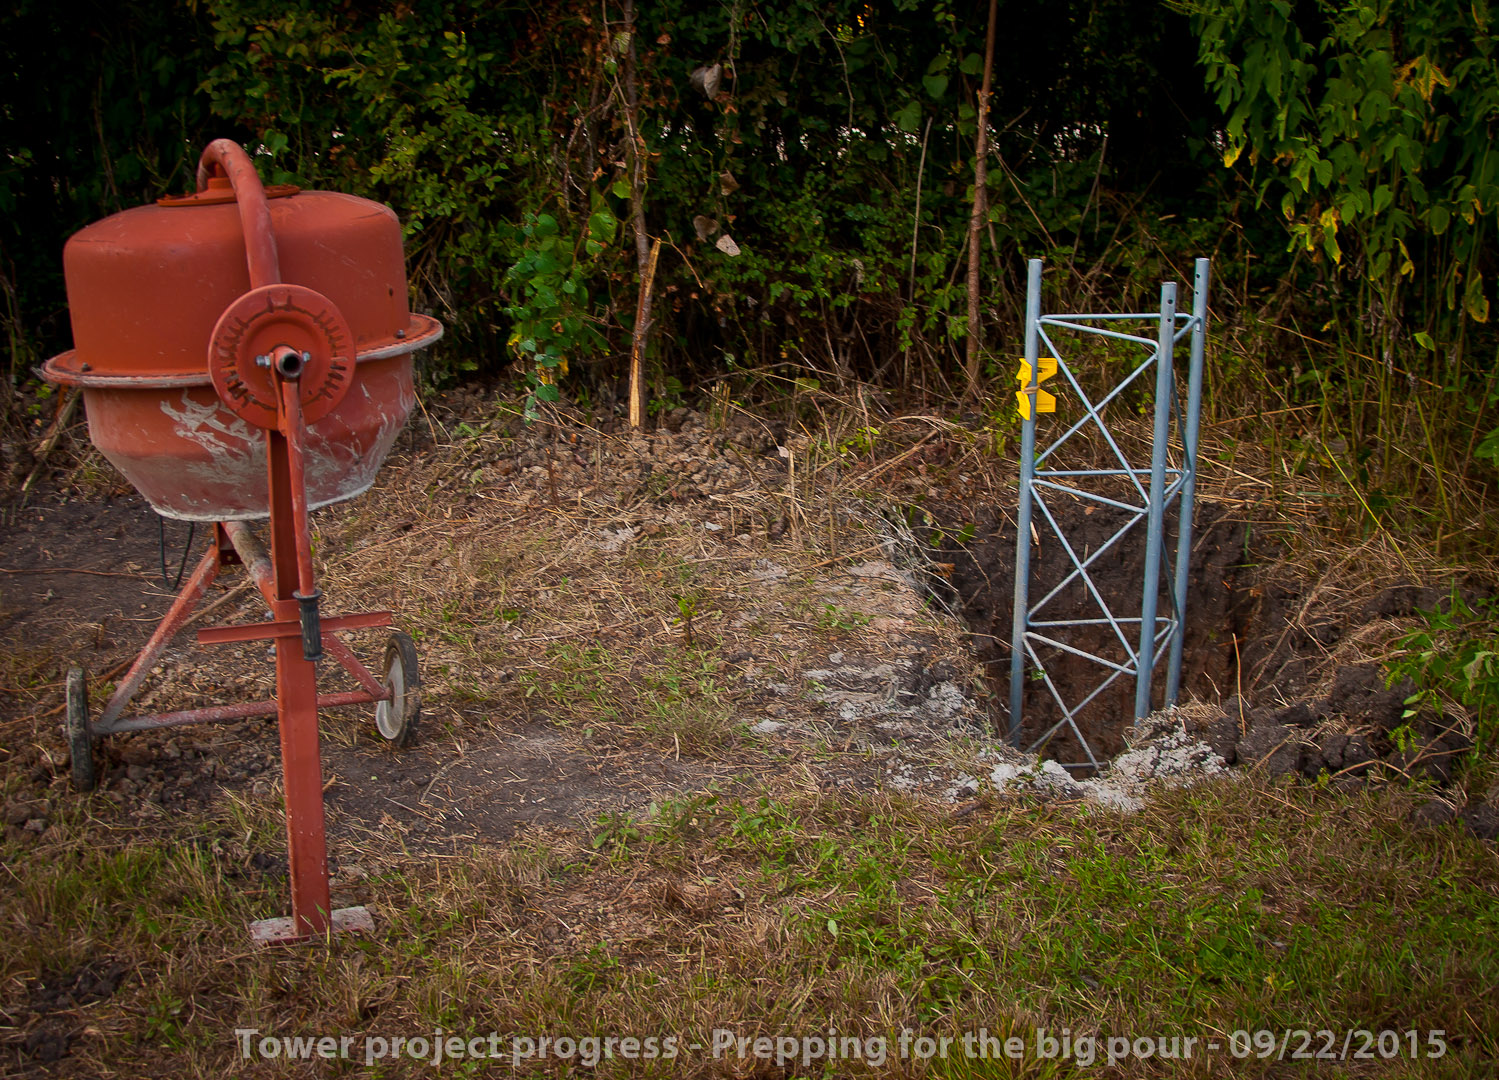
I am using 45G tower sections at my guy points to raise the guy points up above the ground so I wont inadvertantly clip one of the guy wires with the tractor when I am not paying enough attention someday in the future.
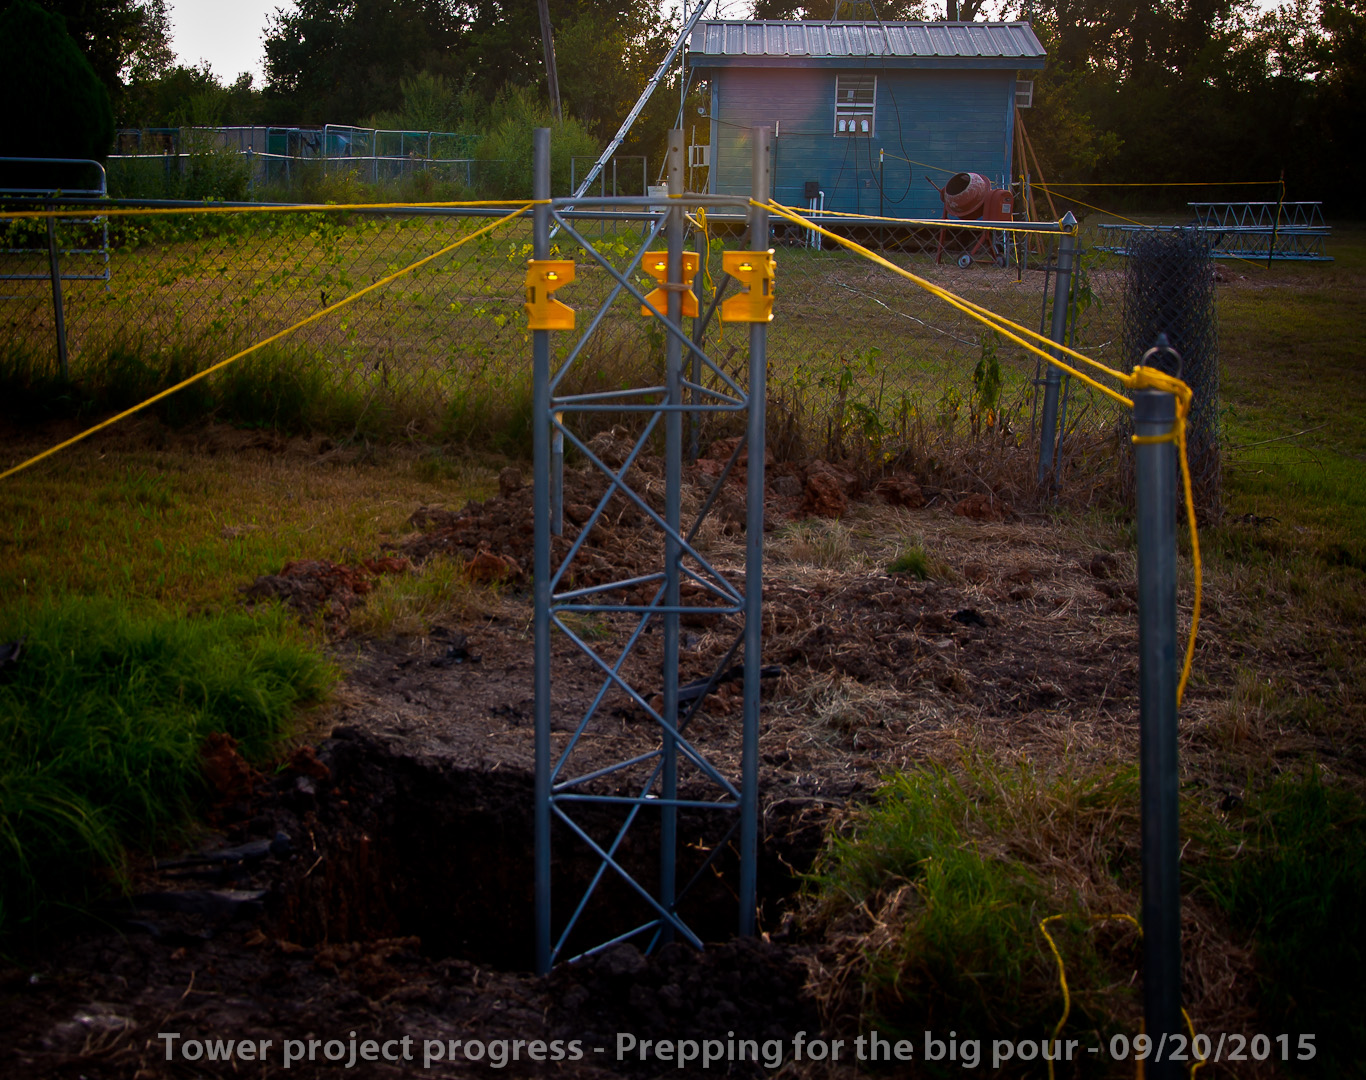
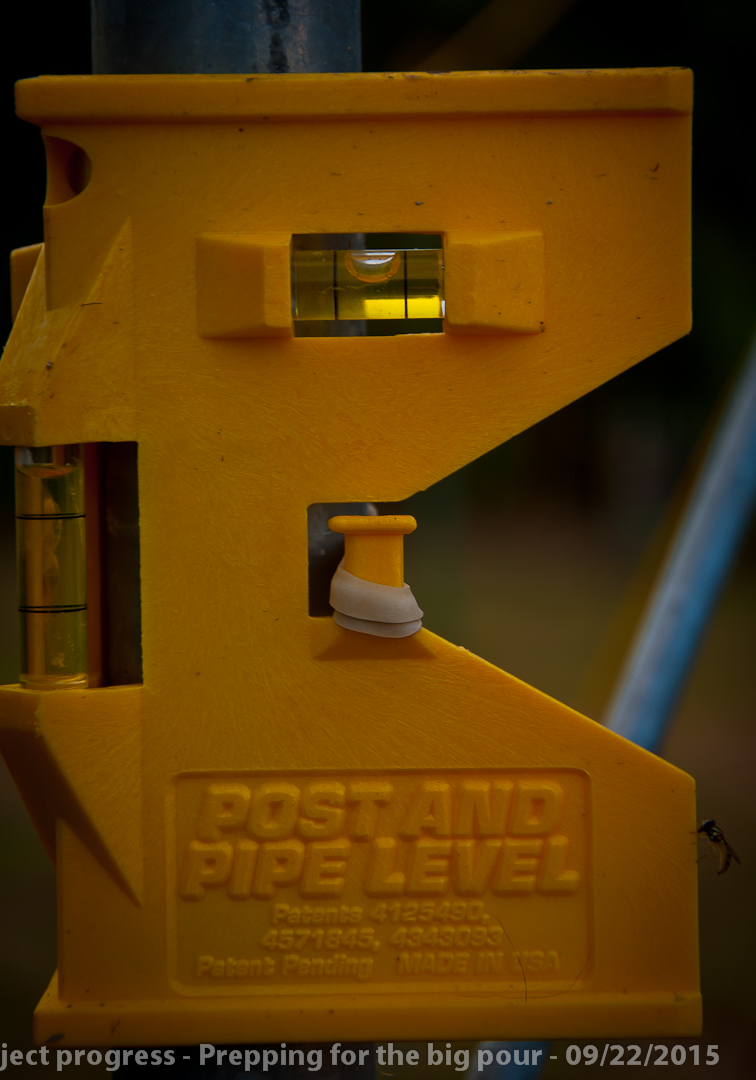
I setup levels to get the base tower sections perfectly plumb.
I tied them all down to make sure they STAYED plumb!

Then I poured about 6-8 bags of sack-crete down in the bottom of each hole to anchor down the tower base sections.
Each tower base section was checked, re-checked and then checked several more times to make sure everything was perfect!
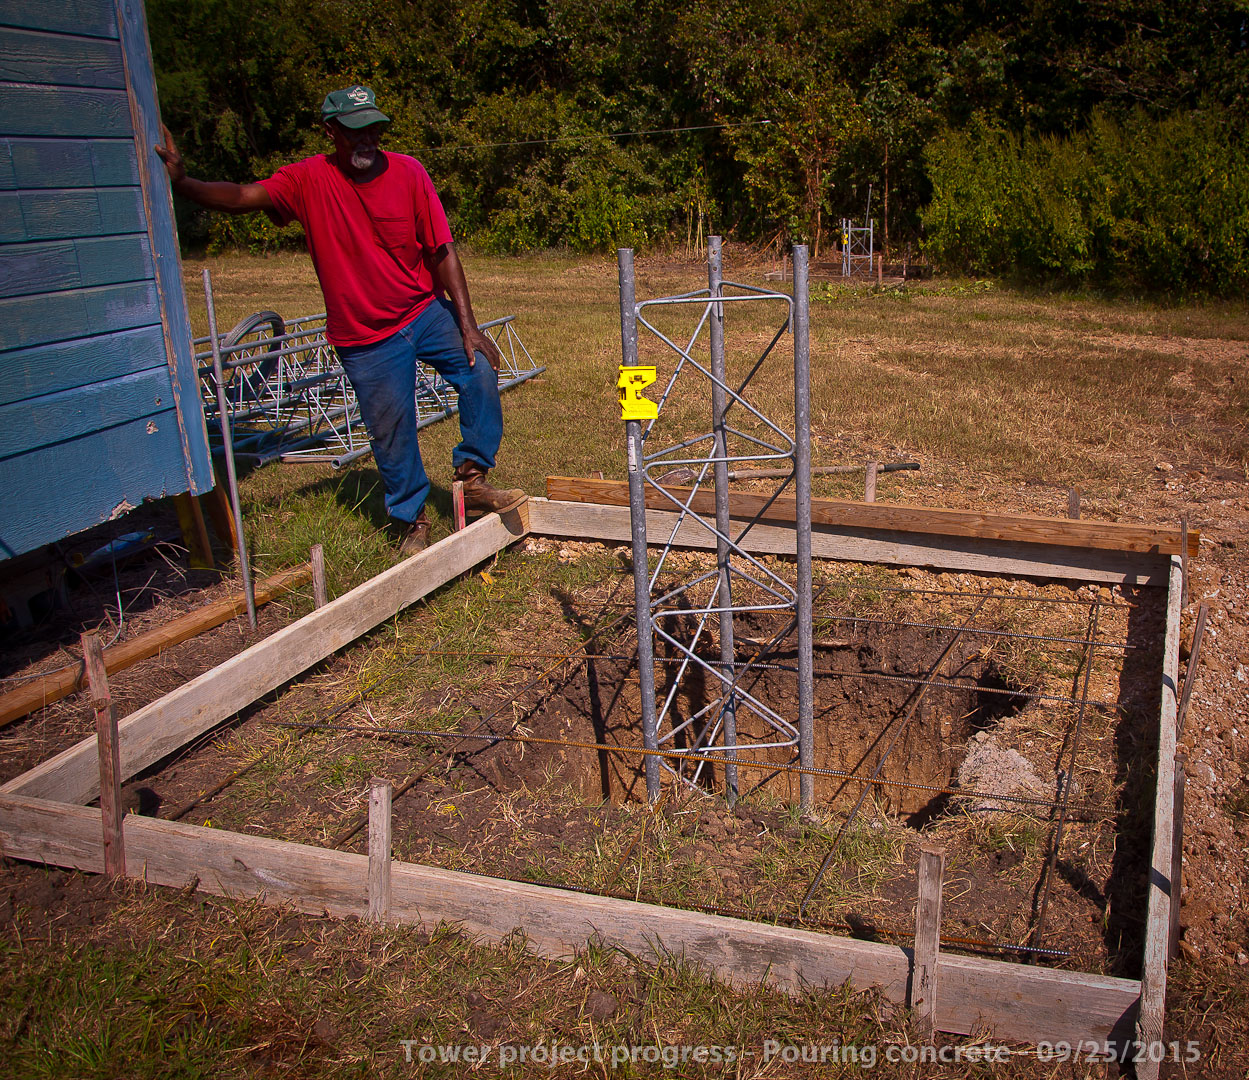
My concrete contractor showed up and put up the forms and laid down all the rebar above and down inside the holes.
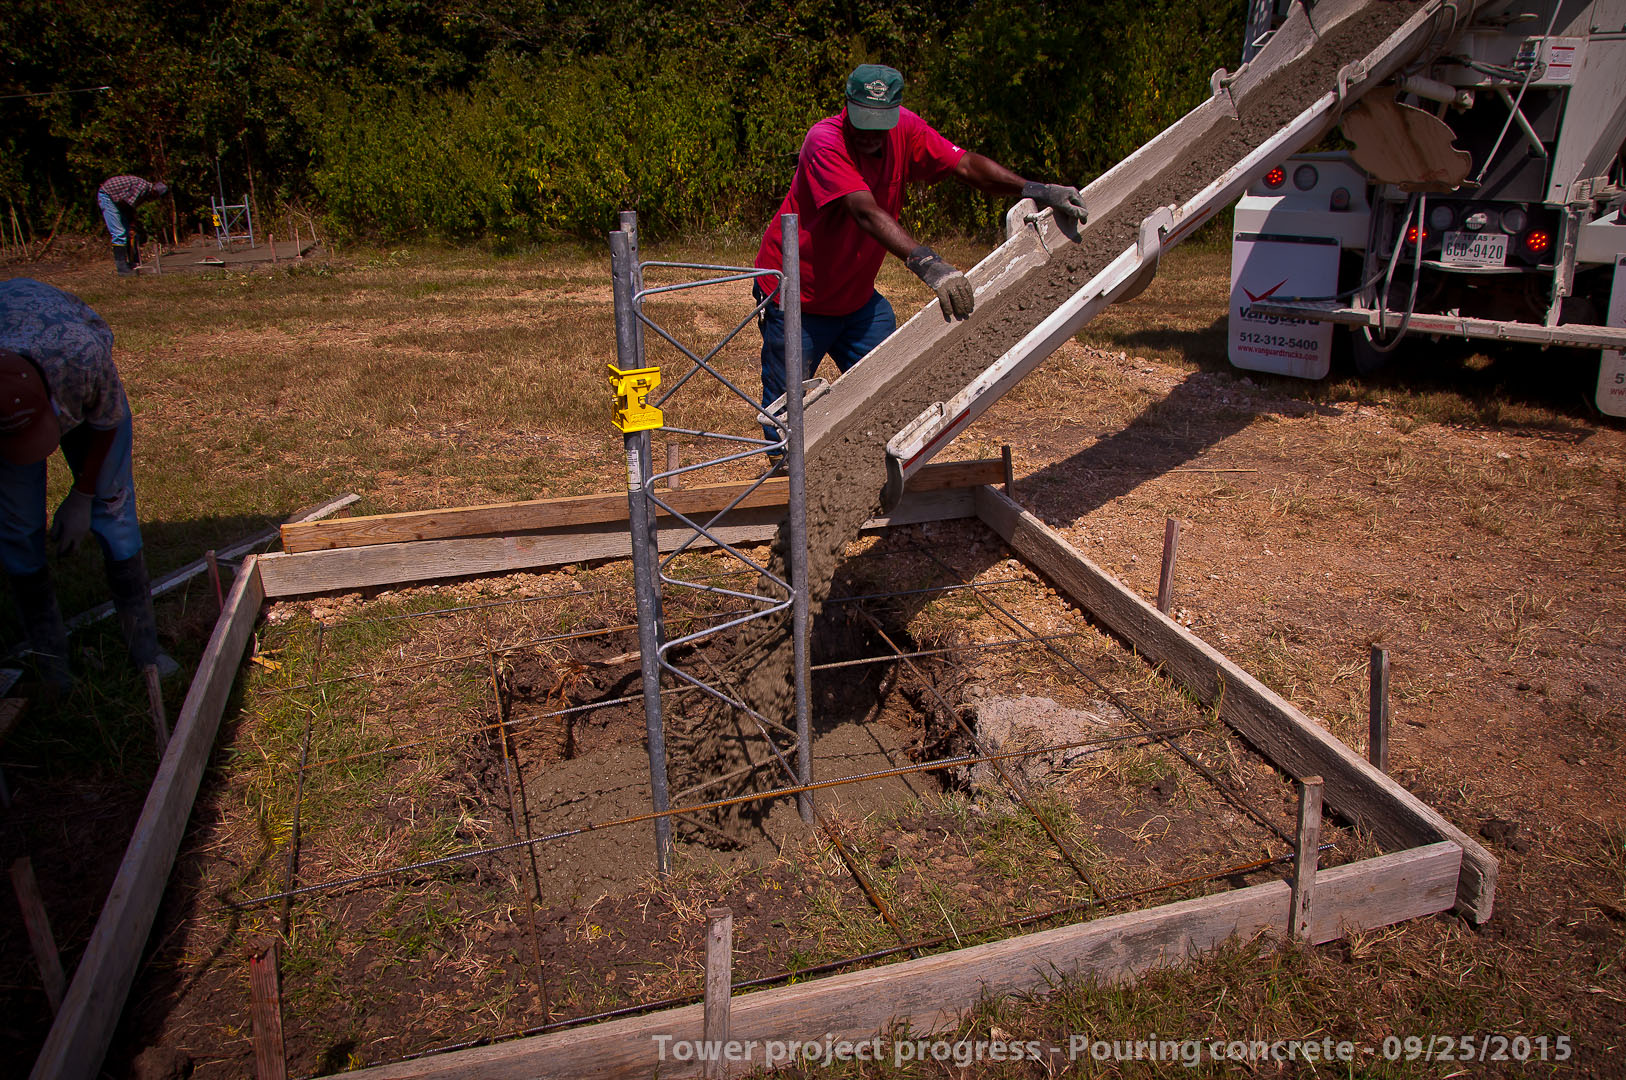
Here they are pouring the 55G base next to the repeater hut. We ended up using 8.5 yards of concrete in all and still came up a little short on the last hole...
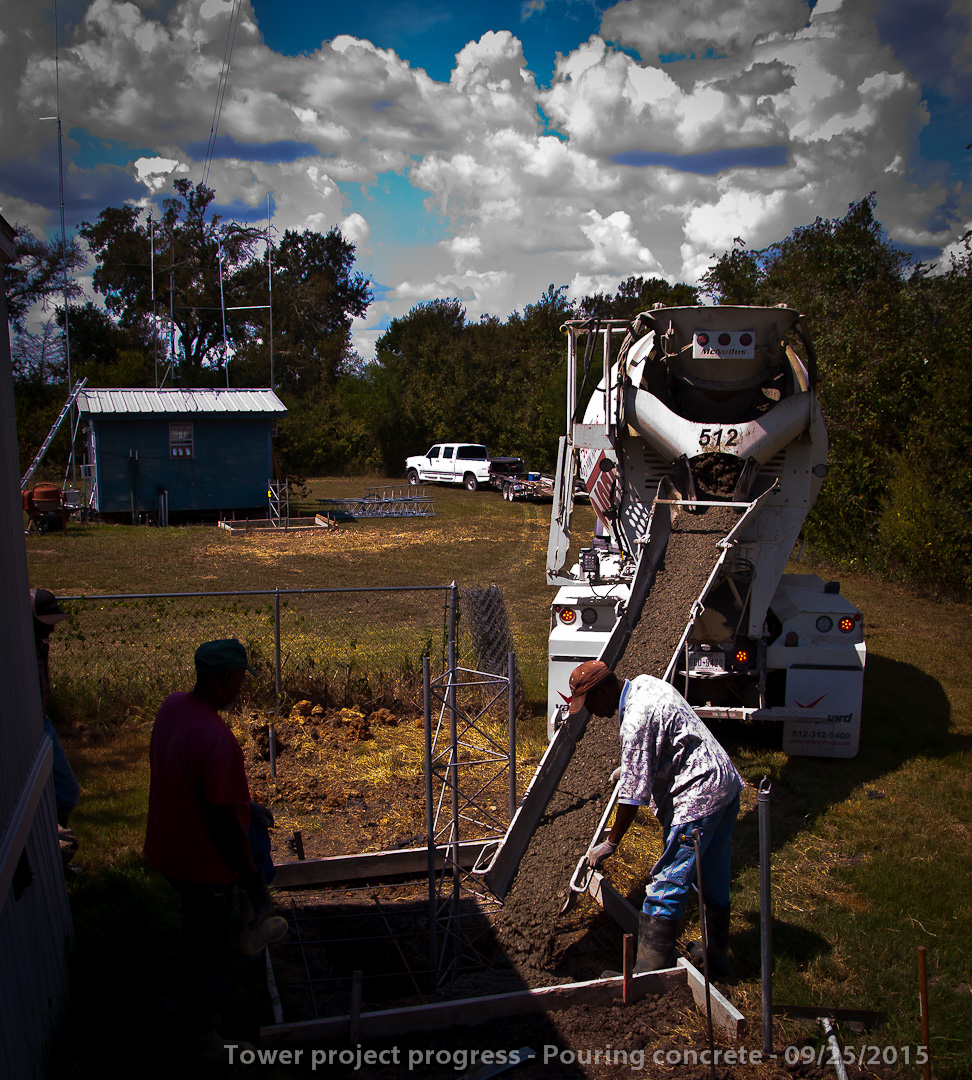
Here they are pouring the 45G tower base behind the guest house.
Here is the 55G tower base next to the repeater hut, finished and ready to cure.
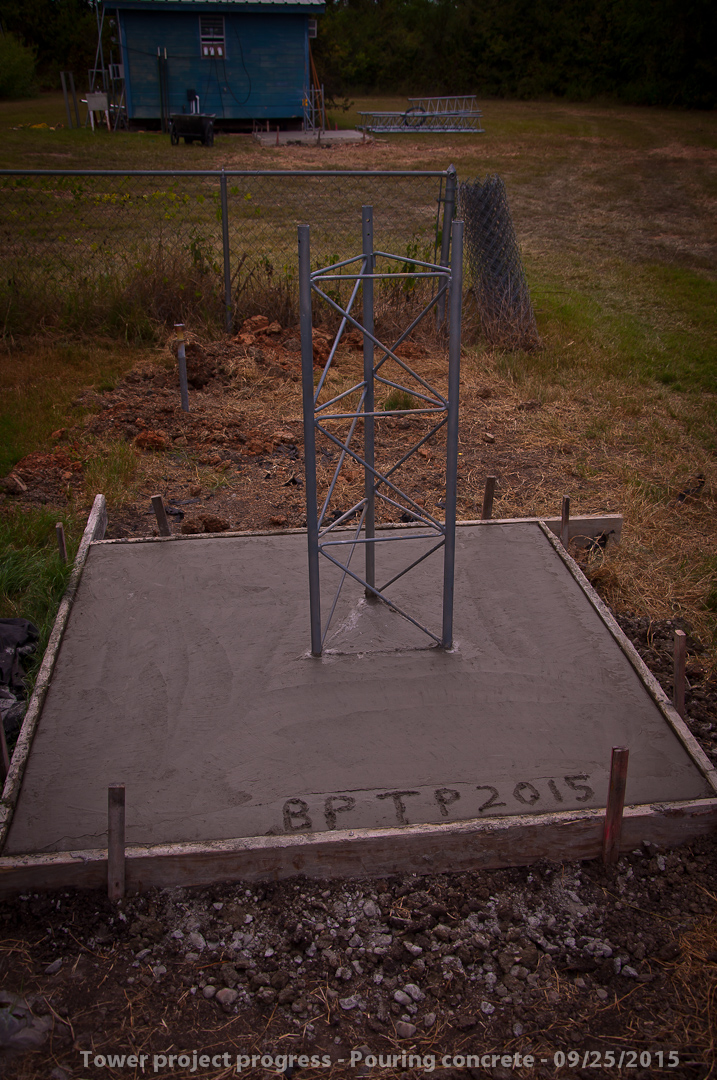
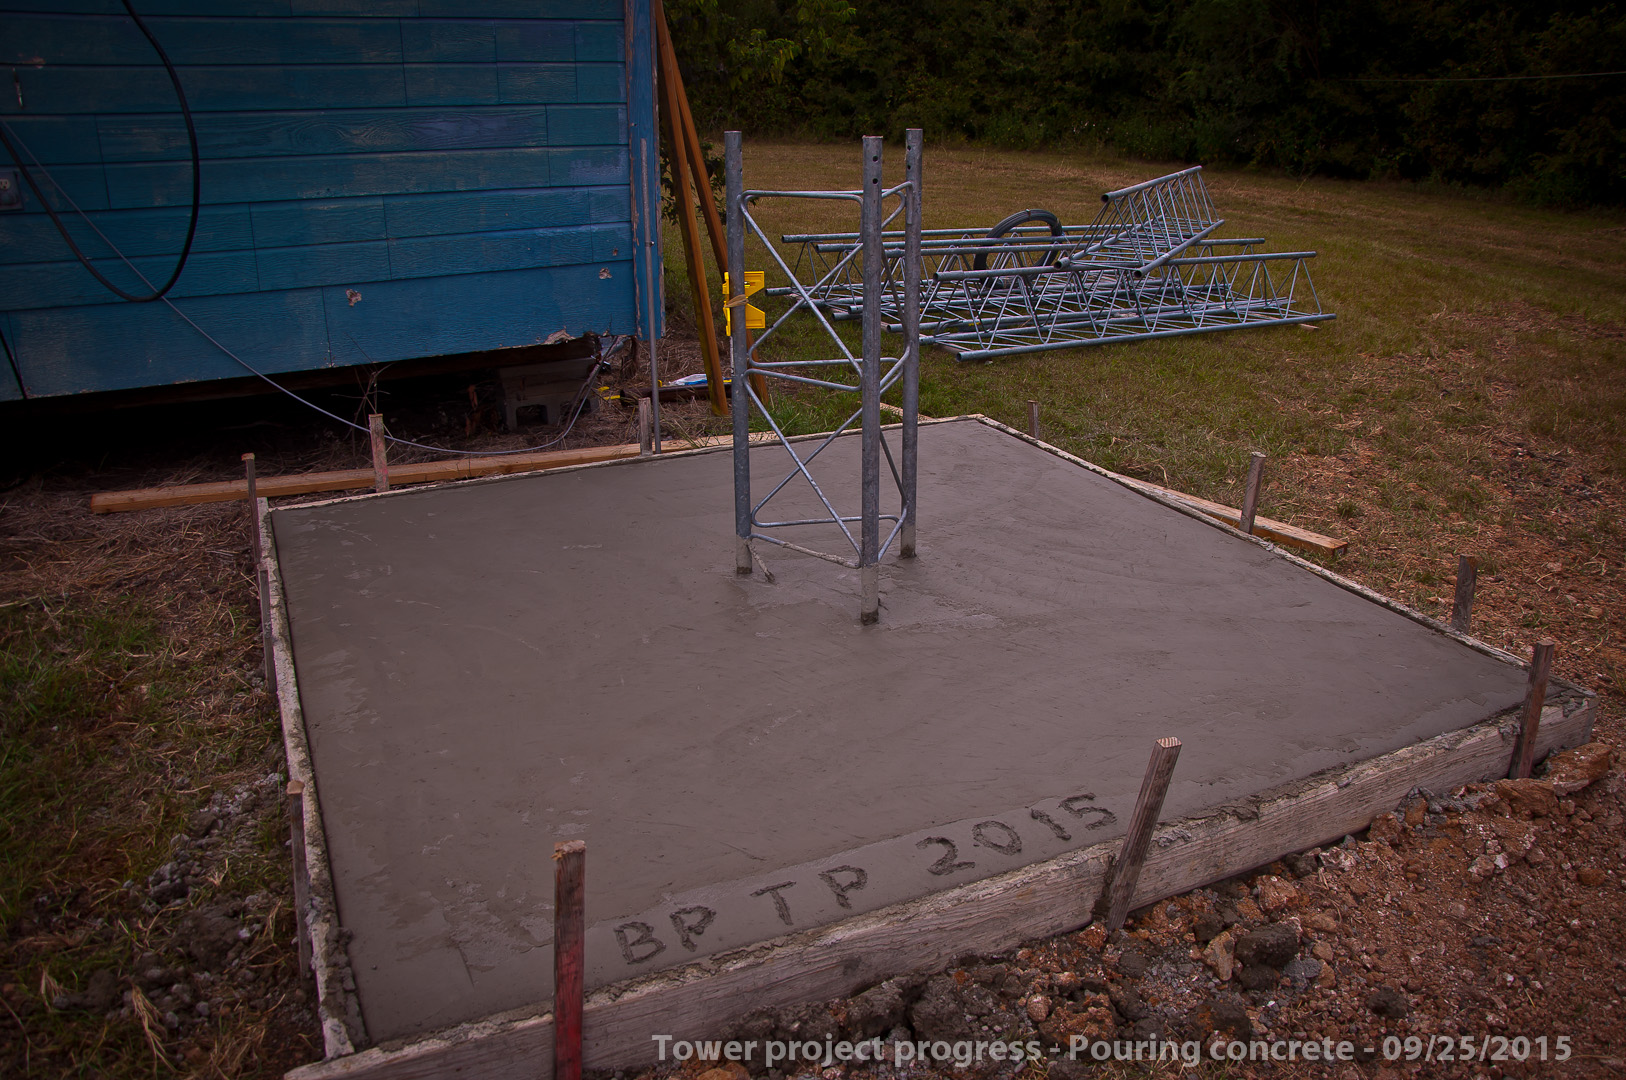
Here is the 45G tower base behind the guest house. Finished and ready to cure.
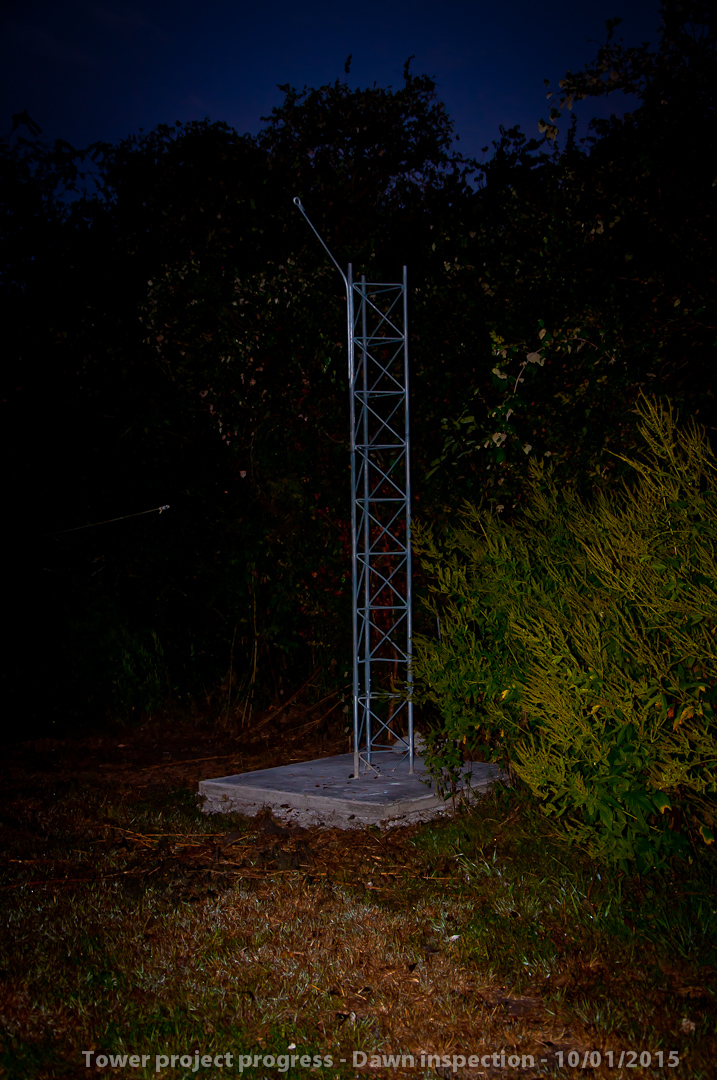
Now I get to wait 14-28 days before stacking tower sections towards the sky!
09/29/2015 - Welding the guy points...
About an hour after dawn is a good time to get busy with the welder... It took almost that much time to prep this tower leg, bend a guy point bar, cut it off to the right length, grind ALL the galvanizing off of the attachment faces, clamp it in place with some hose clamps and tack it into place before making the long hot run with the MIG welder. When it was placed in its new home, I couldn't help but smile...
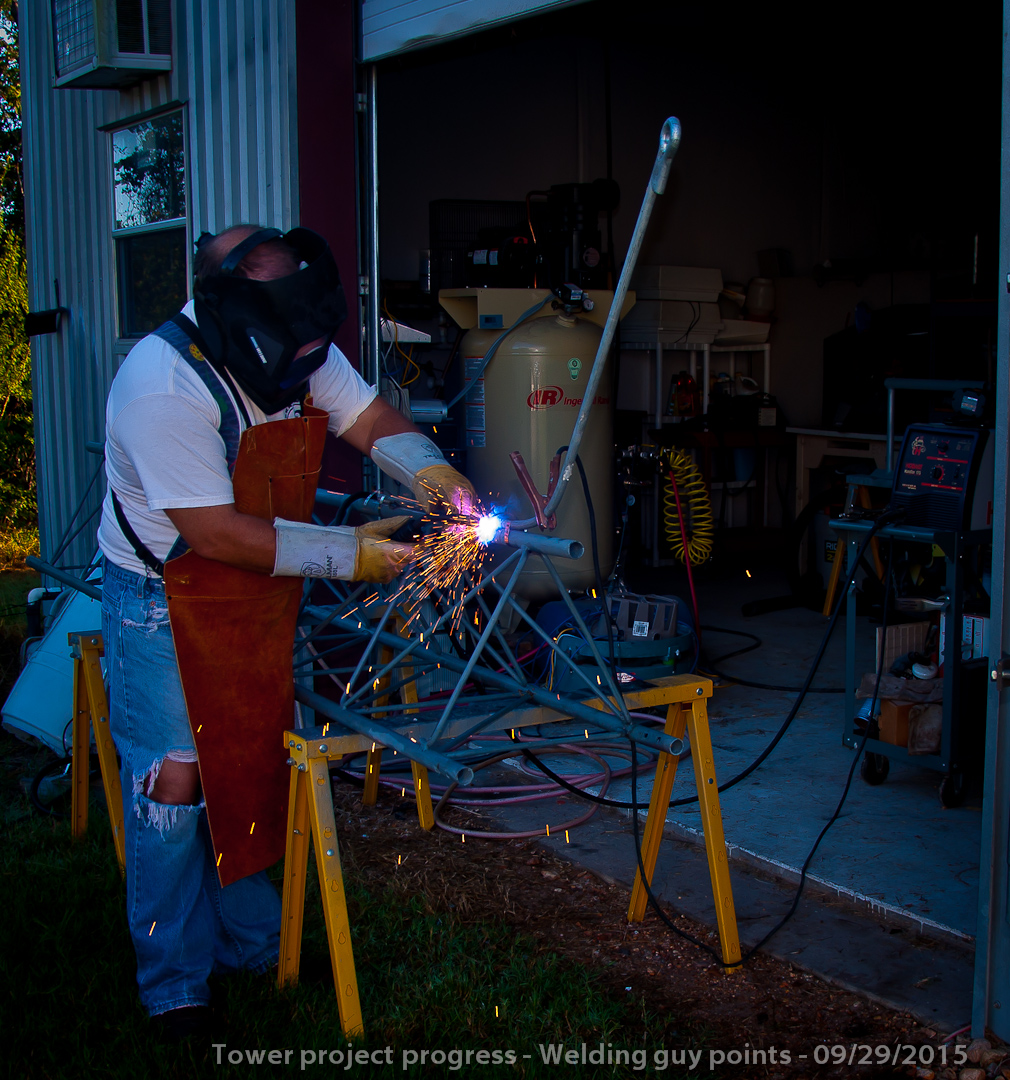
After placing two more of these, the next step is putting together a Gin Pole and getting to work stacking steel towards the sky...
10/04/2015 - Starting to stack steel towards the sky... The 45G tower behind the guest house is the first to go up.
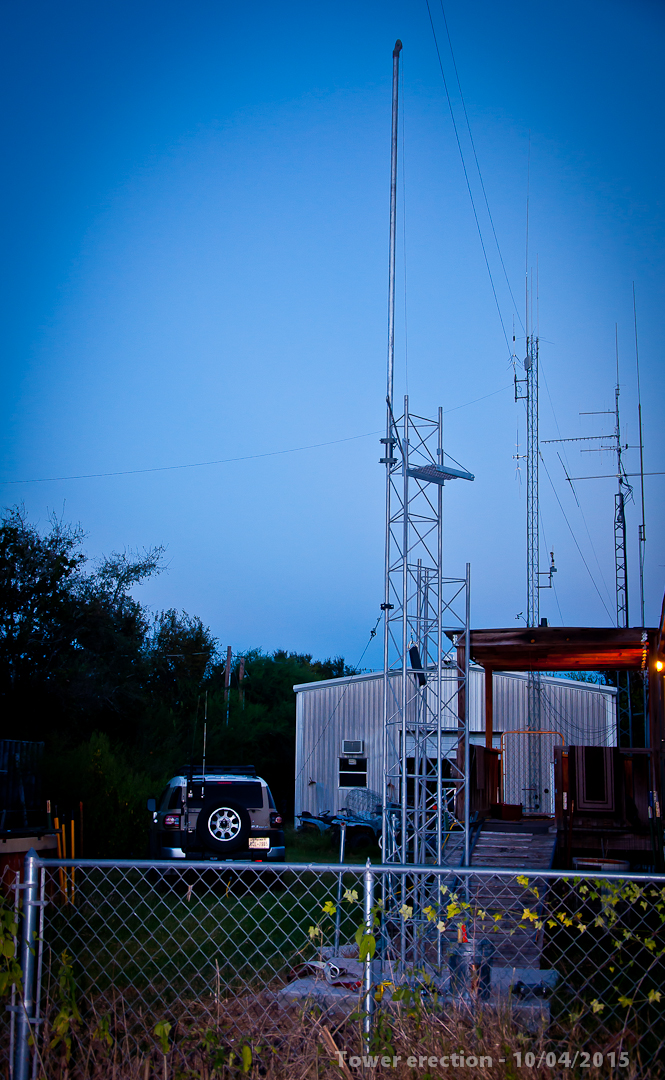
In this photo, section one is already mounted to the base section and the Gin
Pole is pictured here mounted on top and rigged for the next tower section to be
lifted into place by a hitch mounted winch on my Toyota FJ. The next section is
freestanding on the concrete slab and you can see a small black nylon sling
attached to it in the photo - ready for the lift. I am using aircraft cable
here instead of rope - because I just don't trust Chinese rope anymore!
Section two should be placed tomorrow morning... It's pretty easy, I climb up
the side of the tower to wiggle it into place and someone else pushes a button
on the winch controller, gravity does the rest... The only tough part to it is
getting the tower sections to line up, wiggled down into place and getting them
bolted together. They aren't exactly "perfectly" mated, it takes a little
grunting with a 3 ft. long pry bar to make them line up sometimes.
10/05/2015 - Finishing up the 45G tower stack... Up to 30 Ft. - it has become evident I need to add one more tower section before I top it out with a rotor... I will have to find one pronto!
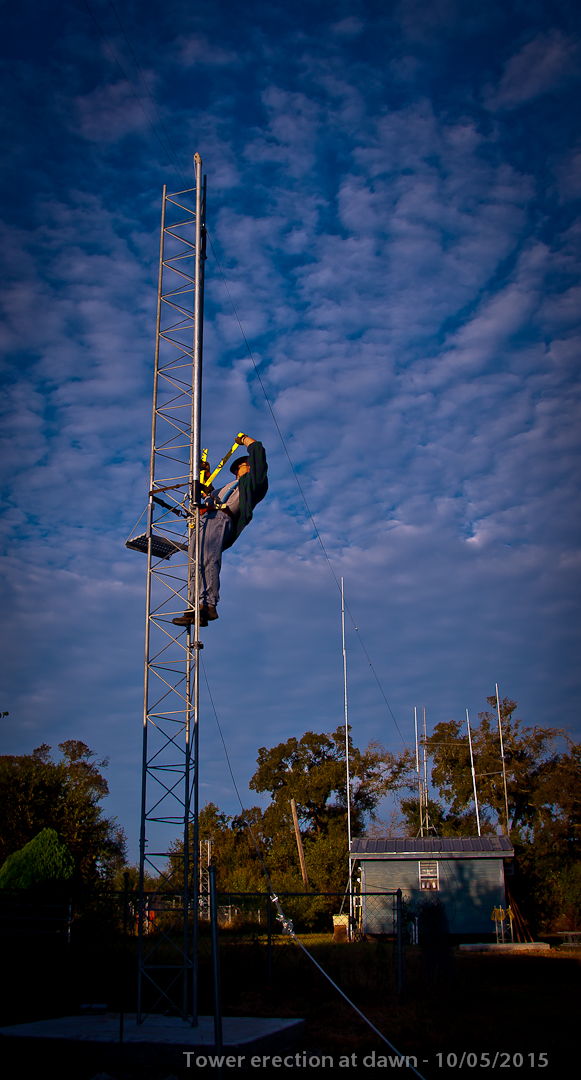
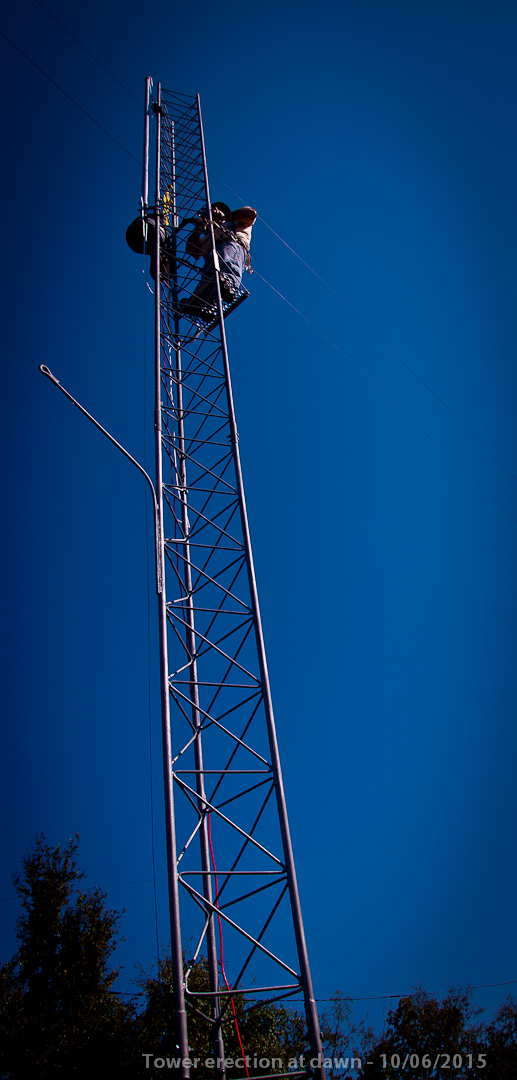
My wife, N5VGE, manned the electric winch mounted on the back of my Toyota FJ and lifted each tower section into place for me. The 45G tower, having been taken down in a storm back in the 1980's, wasn't exactly perfectly matched up on each tower leg. It took some real "encouragement" from a tower jack and a 4 lb. sledge to get the sections together, wiggled down into place and lined up so I could use an electric drill to make the holes line up perfectly - so a bolt would even go through the tower leg! All sections are now bolted together, permanently... The 45G tower is now erect! But now I am waiting for the top bearing plate and the thrust bearing to arrive via UPS... I also need to find ONE more section of 45G to make it a 43 ft. tall tower to clear the trees and the diple antennas strung around it.
10/08/2015 - The 55G tower is starting to go up! Now that we have a rythm and we both know what needs to be done and when, it seems to be going much faster now! And it really, really, REALLY helps that the 55G tower has never been assembled - so the legs are as true as the day they left the factory. Meaning that each section slips onto the next and slides right into place with very little "encouragement" (with a sledge hammer) needed!
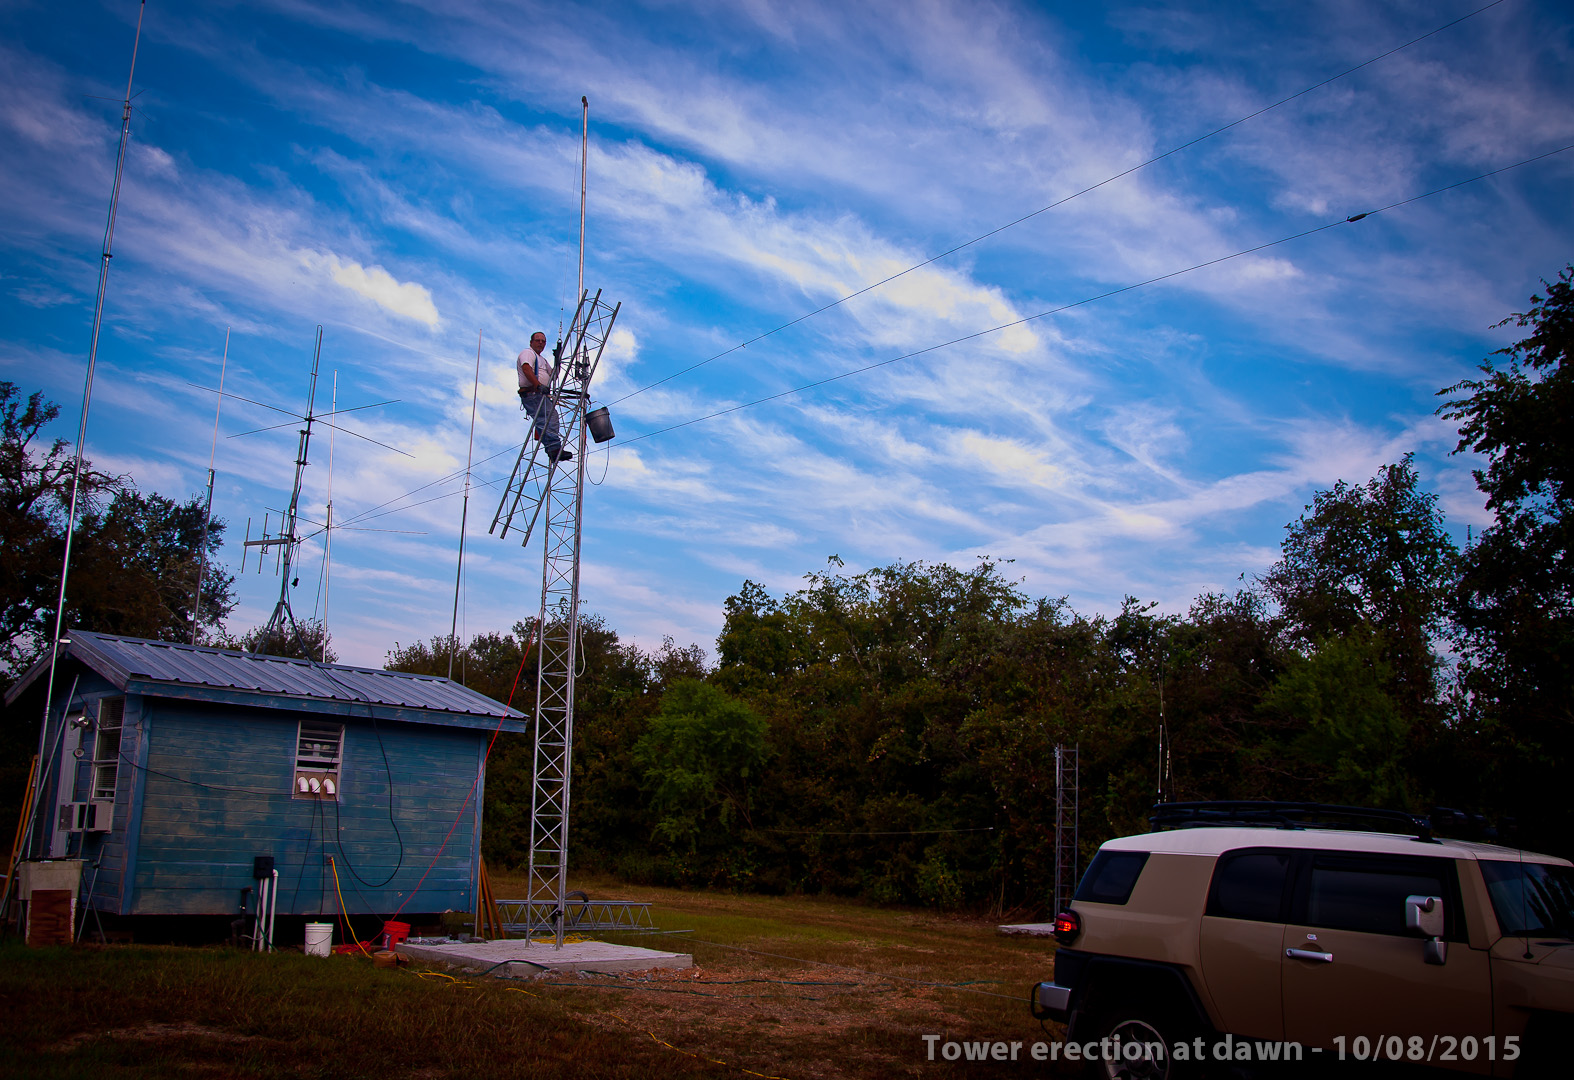
These 55G tower sections weigh about 100 lbs. each. I could hear the cable and the pulleys groan under the stress as each section was being lifted into place. Again, I gave up on trusting Chineses rope, the 1/8" steel cable with a working weight of 340 lbs. that I am using barely does the trick, but I had to go down that small to get enough cable onto the winch to raise this tower up to 100 ft. tall!
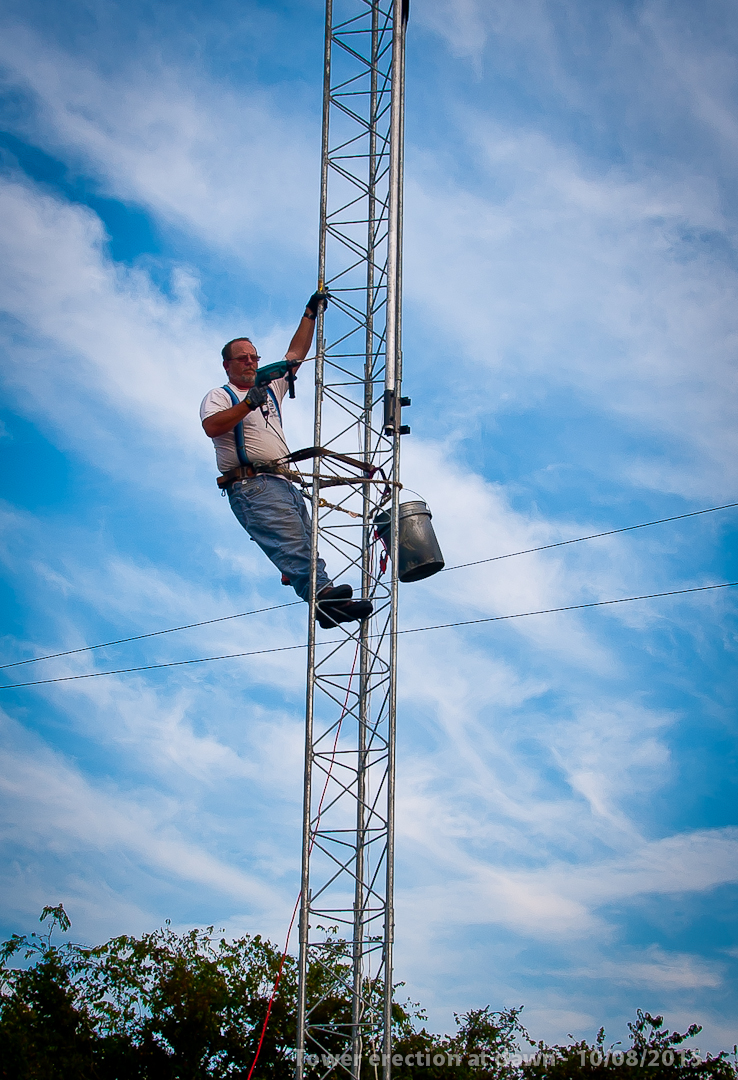
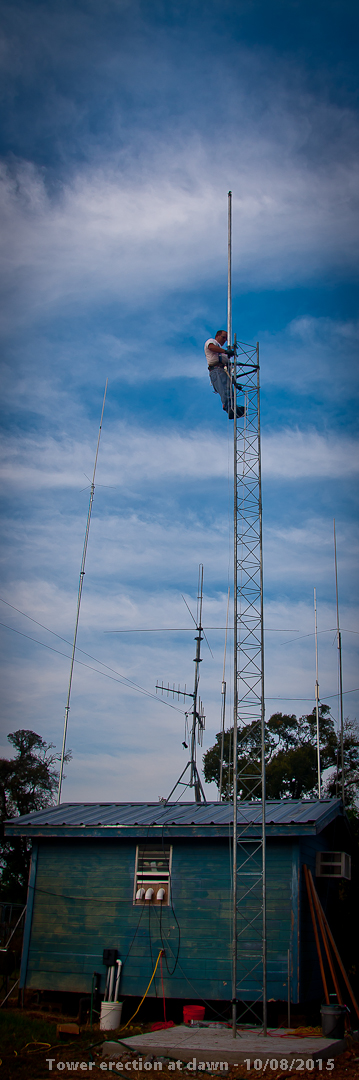
I still had to use the drill to get the bolts to fit into the holes, mostly because of excess flashing left over from the hot dip galvanizing process. I put up as many sections as I had bolts for. The rest of the bolts are on order and we are awaiting their arrival via UPS. Oddly enough, it uses 7/16" bolts that are 2" long, galvanized of course - not a single hardware outlet within 30 miles of me carries such a bolt! They have smaller and larger bolts. They have these bolts in stainless steel, but nobody and I mean NObody carries 7/16" galvanized bolts! I checked! So we ordered the real McCoy from a Rohn dealer and they will arrive soon.
So, at this time, I am sitting on my hands waiting for the UPS guy to show up with my goodies so I can finish stacking tower sections... And start stacking antennas!
10/12/2015 - We went up to the Belton
area on Saturday and picked up two 45G sections and some BOLTS and some guy
point hardware - I didn't get another section stacked until Sunday. On Sunday I
got the next section stacked to make 40 ft. On Monday morning we rigged for the
next section and I am coming to the stark realization that 50 ft. is about all I
am going to be able to manage - with my legs, my health issues and the winch
that barely has enough cable to reach the 70 ft. mark...
It's official, I am getting to old for this crap... LOL Maybe 100 ft. isn't such
a great idea... Climbing up to 40 ft. and hanging out for a while doing the
rigging and waiting for the ground crew to untangle the winch cable that got
snarled up, my endurance was challenged. About the time my feet went numb from
locked knees, I knew the "shakes" weren't too far behind...
Of course it didn't help that the sun was above the horizon and came out from
behind the clouds... When the sun came out - I could literally FEEL it. It went
from cool and comfortable to muggy, hot and downright UNcomfortable... After the
numb feet started and a little bit of knee shaking started, I knew it was time
to come down - NOW...
By the time I reached the bottom of the tower, the shakes had set in with a
vengeance... Telling me that maybe 100 ft. isn't such a good idea. The hut will
just have to live with a 53 ft. tall tower and I am just going to have to be
happy with it!
The 5th section didn't get lifted into place this morning, but it's rigged for
the lift. I am taking some aspirin and eating an early lunch and passing out for
a nap...
Tomorrow is another day, and another section...
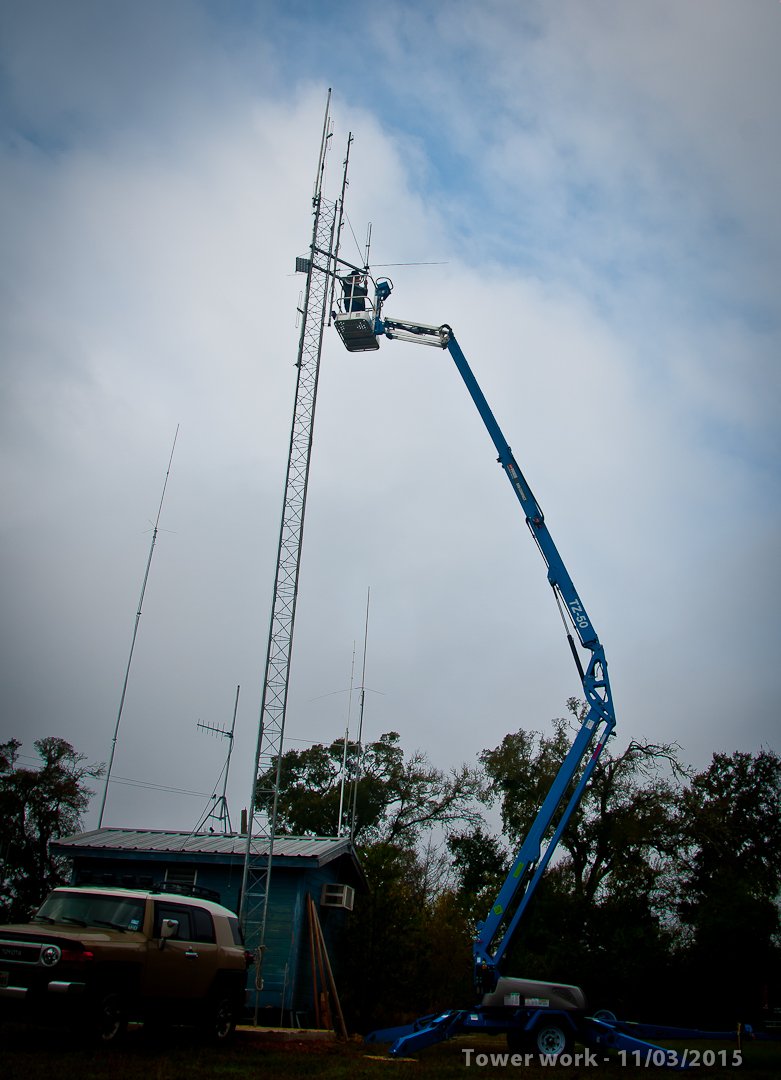
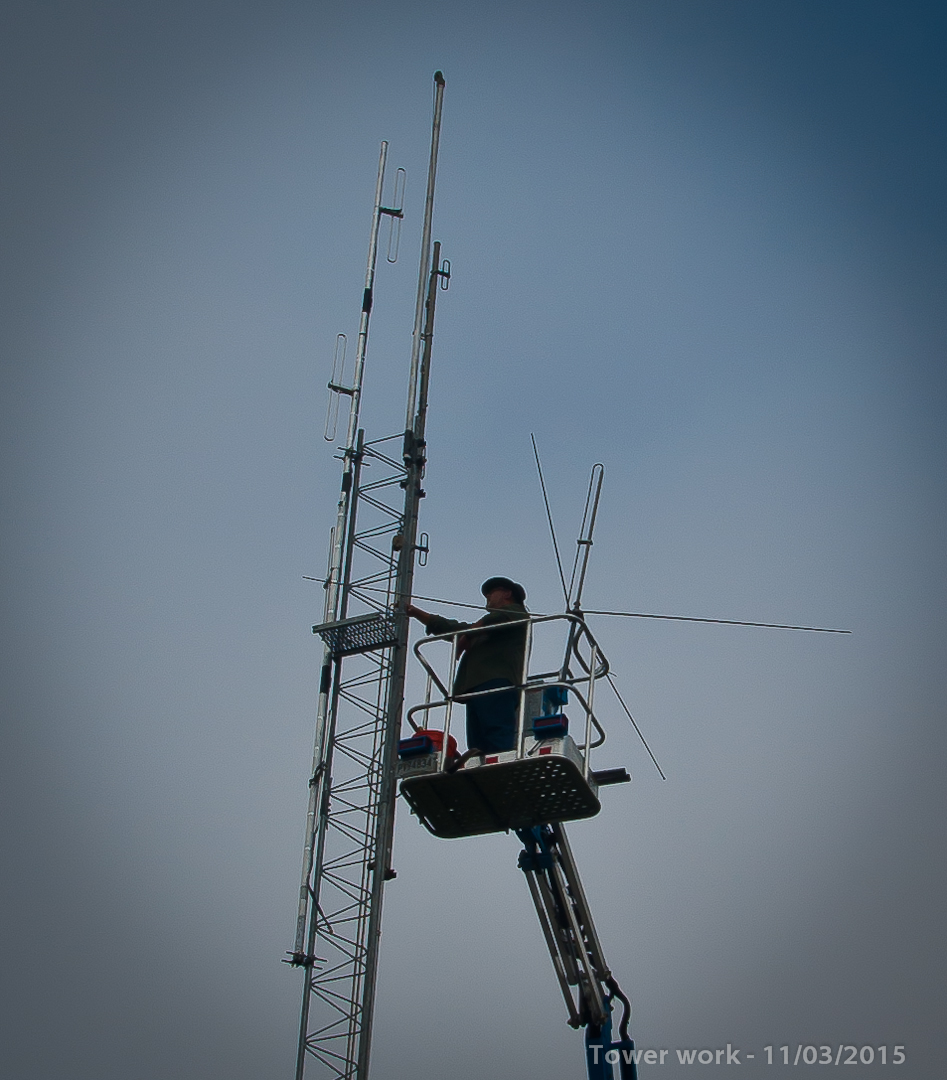
11/03/2015 - I rented a 50 ft. boomlift from a Home Depot over in Magnolia, TX. It made life a little easier. Hanging the last tower section was easy! We got the 2m antenna and the 440 antenna mounted - and the boomlift made putting that big unwieldy heavy bracket mounted 6m groundplane up an absolute snap...
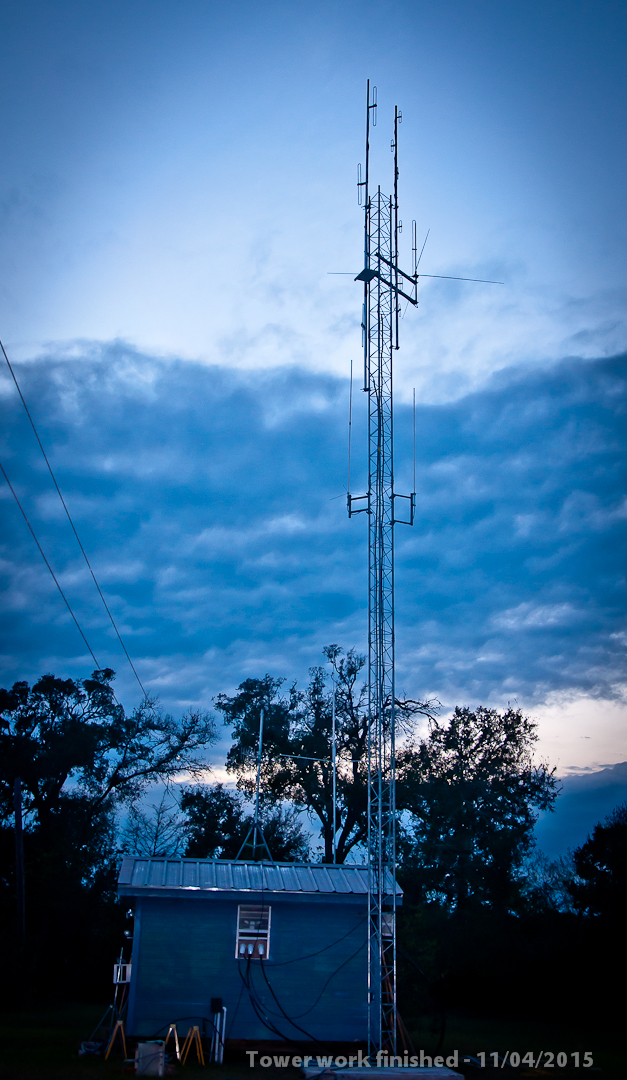
11/04/2015 - And then we were "done"... 6m, 2m, 1.25m, 70cm, 33cm all on one tower... Some of this project took 15 years to come to fruition. Some of it happened in a matter of months. Now that I have the antennas up at a reasonable height, the coverage is noticeably larger. I can hit the machine from downtown Brenham! We are only at 53 ft. AGL. I want to go to 100 ft. When I find some more tower sections and get everything in a pile of the base of this one, ready to go up, I will make that decision for the extra 50 ft. Until then, I am going to try to be happy with what I have. All the antenna feed lines have been stuffed through the window and everything is now hooked up. NOW I can hit the 6m machine from Navasota! The extra 50 ft. would make all the difference in the world but I am biting my lip at the moment...
I think I need to buy stiock in a tie-wrap company after attaching all those feed lines to each and every rung of the tower, all the way down to the ladder rack that takes them over to the repeater hut wall...
Next up, GROUND RODS! It is time to get all the grounding sorted out and installed. Once done, then we can install all the polyphaser lightning protection at the entrance to the repeater hut on a big aluminum plate mopunted to the wall and heavily grounded to the ground rod(s). I am borrowing a "ground rod driver" from a fellow ham and it should make sinking 9-12 big 10 ft. long copper clad and some galvanized ground rods into my tough black gumbo soil a snap...
One step at a time... Now I get to do the "finishing work"! (And probably another re-arrangement of the repeater cabinet rack...)
This whole thing is an exercise in patience, patience has
never been my strong suit... More to follow soon!
Bill - N5MBM